Making a needlebook isn't so hard, is it? Of course not! After doing two of them, I was encouraged to teach an online needlebook class. I am so proud of the students and how their needlebooks came out. You can see their projects HERE.
If anyone uses my instructions to make a needlebook, I'd love it if you sent me a pic so I can add it to my album. :)
Here's my step-by-step instructions for making a needlebook:
Materials Needed:
• Whatever you'll need for your stitched piece. You choose the design, fabric, embellishments, etc. Stitched pieces should be approximately 3-4" square. If you want the back cover stitched, you'll have to take that into consideration also.
• Coordinating cotton fabric of your choice. I've found that the quilt fats (18x22" fabric) are perfect. Or look in the odds and ends bin at the fabric stores to see if there's anything that might work. If you want pockets on the inside of your needlebook, you'll need two pieces of fabric. This is the fabric that will go on the inside of your needlebook, so the size depends on the size of your stitched piece, and whether or not you stitched a back cover.
• Matching 1/4" ribbon. Shouldn't need much more than 14".
• Flat quilt batting - again, the amount depends on size of needlebook. 1/4 yd. should do it.
• Piece of coordinating felt. 5x8" piece should work.
• Coordinating thread to sew it all together.
• Scissors to cut fabric, batting, and felt.
• Sewing Machine. You can sew it together by hand, but a machine makes it go faster and easier.
• Iron
Step One:
Decide on what to stitch for your needlebook cover. I chose a freebie design by Brooke Nolan, "J is for Japanese Embroidery" After I stitched it, I thought it might be a bit small but it turned out to be just fine. I stitched this on 28ct waterlily linen with DMC threads and Rainbow Gallery Treasure Braid. It took me 6.25 hours to stitch. I changed the design by adding two additional floating balls and Mill Hill beads to the center of each.

Step Two:
Choose coordinating fabrics for the back cover and inside cover. Cut the back cover the same size as the front cover. Cut the inside cover the same height as the front/back cover, and twice as wide minus 1/2". Cut the quilt batting the same size as the inside cover (Quilt batting not shown in pic). Press all the pieces with an iron, except for batting.

Step Three:
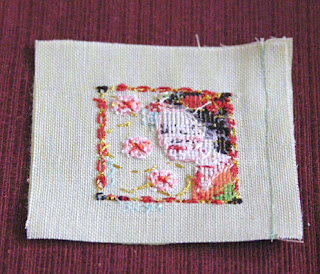
Take front cover and back cover and place right sides together. Stitch right hand side with 1/4" seam allowance.


 Notice the pink sewing machine? This is my Happy Lite that I got last year to do small projects such as needlebooks and ornaments. This is the first time I've used it to make a "small".
Step 4:
Press seam open.


Step Five:
 Here's where the fun part starts! Assemble your pieces. Front/Back Cover, Inside Cover, Batting, Ribbon.
Note: If you want to put pockets inside your needlebook, you will have to cut a piece of fabric the same width as the Inside Cover, and 2/3 the height PLUS 1/2". Fold 1/2" to the wrong side of the fabric, along the LONG edge. Press flat with iron. On the same long side of fabric, stitch a seam 1/4" from folded over edge. Place Pocket with right side down on table. Place Inside Cover on top with right side down, matching bottom edges. Make 1/4" seam on each short edge. The drawing shows what it should look like with the right side facing you. (There are no pics because I didn't put pockets in this one).
Take your Inside Cover and place it right side down on table. Place batting on top. Set aside.

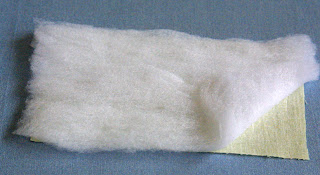
Place your Front/Back Cover right side up (stitching facing you). Cut two pieces of ribbon 6-8" each. Place ribbon on right and left side of cover. You may want to (temporarily) pin the ribbon in place. There are no pics of this part because I forgot (!!!) to put my ribbon on and had to improvise. However, I have relied on my artistic talents to draw a diagram.

Place the Inside Cover/Batting on top of the Front/Back Cover and Ribbon. You may want to pin all three layers together to make sewing it together easier. I chose not to because I'm experienced in sewing.

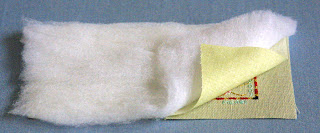
You will want to leave a 3" opening at the bottom of your needlebook so that you can turn it inside out. Notice where I started my seam?

Stitch 1/4" seam all the way around the edge of the needlebook, stopping about 3" from where you started. Notice where I stopped?

Once the sewing is done, you can remove the pins. This is what your needlebook should look like once you've sewed the outside seams.
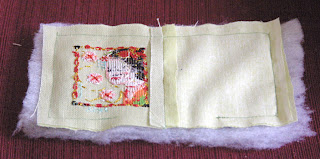
Trim the batting close to the seam. Be careful not to cut the fabric. Once you've trimmed the batting, cut the corners at an angle. This is what it should look like.

Step Six:
Carefully turn your project inside out. Your Front/Back Cover, Inside Cover, and Ribbons should be on the outside. The batting should be on the inside. To help get your corners "pointy", use a slim object to push them out. I used a wood skewer. You can also use a knitting needle, crochet hook, pen with a cap on. Be careful not to poke the object through the fabric.


Using the iron, press the front and back of your needlebook. You will have to tuck in the fabric where the opening is at the bottom of your needlebook.

Step Seven:
Take needle and thread to sew the opening closed. Press both sides of your needlebook again. LOL, can you tell I'm fanatical about wanting my project smooth and flat?


Step Eight:
Cut felt 1/4" smaller than the inside of your needlebook. One piece of felt will make 2 pages. If you wish to have 4 pages, cut 2 pieces of felt. I personally wouldn't do more than 4 pages as it would make the needlebook pretty bulky. Optional: I used pinking shears to cut the edge of the felt.

Place felt in the center of the needlebook. Use pins to hold it in place.


Place needlebook on sewing machine with felt side down and Front/Back Cover facing up. Stitch a line where the front and back covers are seamed together.
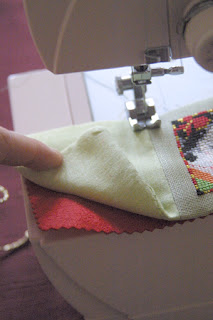
This is what it should look like when the felt page(s) are stitched in.

I hand-sewed on the gold cording to match the closure. Tie the ribbon and viola, you have a finished needlebook!


Other needlebooks I've done:
Je Brode/I Embroider
Friendship Grows
Whoo-Me Needlebook
Blessed Be Needlebook #1
Blessed Be Needlebook #2
Victorian Pansies Needlebook
©2007 All rights reserved.
If anyone uses my instructions to make a needlebook, I'd love it if you sent me a pic so I can add it to my album. :)
Here's my step-by-step instructions for making a needlebook:
Materials Needed:
• Whatever you'll need for your stitched piece. You choose the design, fabric, embellishments, etc. Stitched pieces should be approximately 3-4" square. If you want the back cover stitched, you'll have to take that into consideration also.
• Coordinating cotton fabric of your choice. I've found that the quilt fats (18x22" fabric) are perfect. Or look in the odds and ends bin at the fabric stores to see if there's anything that might work. If you want pockets on the inside of your needlebook, you'll need two pieces of fabric. This is the fabric that will go on the inside of your needlebook, so the size depends on the size of your stitched piece, and whether or not you stitched a back cover.
• Matching 1/4" ribbon. Shouldn't need much more than 14".
• Flat quilt batting - again, the amount depends on size of needlebook. 1/4 yd. should do it.
• Piece of coordinating felt. 5x8" piece should work.
• Coordinating thread to sew it all together.
• Scissors to cut fabric, batting, and felt.
• Sewing Machine. You can sew it together by hand, but a machine makes it go faster and easier.
• Iron
Step One:
Decide on what to stitch for your needlebook cover. I chose a freebie design by Brooke Nolan, "J is for Japanese Embroidery" After I stitched it, I thought it might be a bit small but it turned out to be just fine. I stitched this on 28ct waterlily linen with DMC threads and Rainbow Gallery Treasure Braid. It took me 6.25 hours to stitch. I changed the design by adding two additional floating balls and Mill Hill beads to the center of each.

Step Two:
Choose coordinating fabrics for the back cover and inside cover. Cut the back cover the same size as the front cover. Cut the inside cover the same height as the front/back cover, and twice as wide minus 1/2". Cut the quilt batting the same size as the inside cover (Quilt batting not shown in pic). Press all the pieces with an iron, except for batting.

Step Three:
Take front cover and back cover and place right sides together. Stitch right hand side with 1/4" seam allowance.


 Notice the pink sewing machine? This is my Happy Lite that I got last year to do small projects such as needlebooks and ornaments. This is the first time I've used it to make a "small".
Step 4:
Press seam open.


Step Five:
 Here's where the fun part starts! Assemble your pieces. Front/Back Cover, Inside Cover, Batting, Ribbon.
Note: If you want to put pockets inside your needlebook, you will have to cut a piece of fabric the same width as the Inside Cover, and 2/3 the height PLUS 1/2". Fold 1/2" to the wrong side of the fabric, along the LONG edge. Press flat with iron. On the same long side of fabric, stitch a seam 1/4" from folded over edge. Place Pocket with right side down on table. Place Inside Cover on top with right side down, matching bottom edges. Make 1/4" seam on each short edge. The drawing shows what it should look like with the right side facing you. (There are no pics because I didn't put pockets in this one).
Take your Inside Cover and place it right side down on table. Place batting on top. Set aside.


Place your Front/Back Cover right side up (stitching facing you). Cut two pieces of ribbon 6-8" each. Place ribbon on right and left side of cover. You may want to (temporarily) pin the ribbon in place. There are no pics of this part because I forgot (!!!) to put my ribbon on and had to improvise. However, I have relied on my artistic talents to draw a diagram.

Place the Inside Cover/Batting on top of the Front/Back Cover and Ribbon. You may want to pin all three layers together to make sewing it together easier. I chose not to because I'm experienced in sewing.


You will want to leave a 3" opening at the bottom of your needlebook so that you can turn it inside out. Notice where I started my seam?

Stitch 1/4" seam all the way around the edge of the needlebook, stopping about 3" from where you started. Notice where I stopped?

Once the sewing is done, you can remove the pins. This is what your needlebook should look like once you've sewed the outside seams.

Trim the batting close to the seam. Be careful not to cut the fabric. Once you've trimmed the batting, cut the corners at an angle. This is what it should look like.

Step Six:
Carefully turn your project inside out. Your Front/Back Cover, Inside Cover, and Ribbons should be on the outside. The batting should be on the inside. To help get your corners "pointy", use a slim object to push them out. I used a wood skewer. You can also use a knitting needle, crochet hook, pen with a cap on. Be careful not to poke the object through the fabric.


Using the iron, press the front and back of your needlebook. You will have to tuck in the fabric where the opening is at the bottom of your needlebook.

Step Seven:
Take needle and thread to sew the opening closed. Press both sides of your needlebook again. LOL, can you tell I'm fanatical about wanting my project smooth and flat?


Step Eight:
Cut felt 1/4" smaller than the inside of your needlebook. One piece of felt will make 2 pages. If you wish to have 4 pages, cut 2 pieces of felt. I personally wouldn't do more than 4 pages as it would make the needlebook pretty bulky. Optional: I used pinking shears to cut the edge of the felt.

Place felt in the center of the needlebook. Use pins to hold it in place.


Place needlebook on sewing machine with felt side down and Front/Back Cover facing up. Stitch a line where the front and back covers are seamed together.

This is what it should look like when the felt page(s) are stitched in.

I hand-sewed on the gold cording to match the closure. Tie the ribbon and viola, you have a finished needlebook!


Other needlebooks I've done:
Je Brode/I Embroider
Friendship Grows
Whoo-Me Needlebook
Blessed Be Needlebook #1
Blessed Be Needlebook #2
Victorian Pansies Needlebook
©2007 All rights reserved.


21 comments:
thanks Meari, I am going to keep this in my favorites and possibly use it one day!
Fantastic tutorial. I like the sewing machine too. Been wanting to get myself a sewing machine and a little one would be a great place to start until I figure out how this sewing thing works.
Thanks for the great tutorial. Your class did a most excellent job on their needlebooks.
Fantastic tutorial!!! And your students all did such lovely work.
Barb in TX
Your needlebook is so pretty, and you make it look so easy. I have a needlebook (as well as a biscornu) on my list of items I want to make. Thanks for the wonderfully clear directions and pictures. The pictures really help as I'm a visual learner.
Sue
Oh, thanks for the wonderful tutorial, Meari! The piccys are wonderful and make it all so clear! I know it will be a tremendous help for me when I finally attempt to make one! :-)
And Big Congrats on having your tutorial added to the Focus on Finishing blog... :-)
All your students did beautiful work on their needlebooks! :-)
Thank you for this tutorial! I am going to be using it soon to make my own needlebook. I do have one question, though. Can you explain better the type of stitch you used to sew the opening shut once you had the needlebook turned right side out, towards the end? I have seen it referred to as a "slip stitch" but cannot find a diagram and I'm new to sewing. Thanks! Danielle
thank you for the excellent, precise instructions - made stitching the needle case really easy peasy.
from Doha, Qatar
Great tutorial. Made one with a panel print for the front and went together quickly. Will make more.
I know this is an old post, but you made the needlebook seem so much easier to make than other tutes I have seen.. I have a swap coming up and I believe I going to make my first needlebook out of XS..
Awesome Meari- I stitched one for a friend in my Sampler
Guild group as a thank you gift and couldn't decide how to finish it- you were a great help-thanks!!!
Thanks! Very clear master-class.
nice work¡ all steps are very clear
Asi da gusto,con semejante maestra,muchas gracias por el tutorial,me uno a tu blog marabilloso
Thank your for your clear tutorial. Now I can finally make one my own!
Ditto what everyone else said, and another thank you. Your tutorial is very clear. I shall use it to make a needle book out of Trish Burr's rosebud kit.
Thank you for the very clear tutorial on making this lovely needlecase! I have a small cross-stitched square waiting for the perfect project and found it today here on your website.
Thank you!
Maravilhoso!!!!
hugs de Maria Filomena
I just want to say thanks for the awesome tutorial! I made a needlebook using it, there are pics on my blog. :D Thank you so much!
very good!
great tutorial . Thanks
Post a Comment