Showing posts with label how to. Show all posts

Jun 22, 2010

Button Storage

I'm failing miserably in my quest for an adorable, innovative, cheap thrifty cost effective way to store my buttons. I'm not giving up hope, though. I *will* figure something out!

Meantime, I've discovered I have a "secret" button fetish. Funny how when you start looking for something else, the things you find...

These sit on a dresser in the hallway outside my bathroom. Most of them are buttons I've saved over the years from old, discarded clothes. I think I started doing that as a teenager -- I remember my Dad telling me to cut off the buttons from his old work clothes when they were tattered and un-repairable.

The top cases are double sided. I had these *in* the above mentioned dresser. The bottom case is what I came up with to store the newly acquired buttons from last week.

Close up of the other side of the double sided cases.


Here are some nifty button storage ideas I found:


Test Tubes


Muffin Tins


Storage Boxes from Harbor Freight
(These look familiar!)


Shelves


Lunch Boxes & Spice Rack
Glass Jars from Michaels

Jun 14, 2010

Bead Storage

Over the years, I have accumulated quite a stash of seed beads. All these little packages are running scattered all over the place. (How did I manage to accumulate 4 packages of Gold #40557 Petite Mill Hill beads?!?)

I figured out a very inexpensive way to store them all in one place! I know, I know. You're wondering, "How?" Look at this:

It's a 7-Day Pill "Cabinet" from a store called The Dollar Tree, where everything is $1. They come in different colors, too. Purple, Blue, Green, Clear.

I know, I know. You're thinking, "Great. But who wants all that writing on there? We're storing beads." OK, so maybe you weren't thinking it, but I was! Well...

First, I tried Goo Gone to get the lettering off. No dice. Then I tried nail polish remover. No dice.

Guess what? A COMBINATION of them both took the lettering off! Amazing. It came off pretty easy, too. Fifteen minutes and a few dirty q-tips later...


A compact, 28-compartment bead storage system is born. One package of regular (or 3 packages of petite) Mill Hill beads will fit in a compartment. (Incidentally, I used my label maker to label each compartment with the type and stock number of the beads.)

All for the low, low price of $1!
How can you go wrong with that?


P.S. The Dollar Tree also sells little bottles of Goo Gone (in the automotive aisle) and nail polish remover for $1 each, so if you had to buy those your total cost would only be $3.

REVISED: Per Carol's request, I'm adding information about my label maker. I think it retails for around $50. I got this one several years ago during one of the Black Friday sales (back when they had *good* sales) for the low, low price of FREE after rebate. It works great!

Dymo Labelmaker 200

Jun 5, 2010

Bobbin Mania!

A couple months ago, I looked through my lace stash (Yes, I have stash of that too!) and said to myself, "Self... There has *got* to be an easier way to store this stuff and make it easily accessible" Luckily, self didn't answer back. LOL

I saw this tutorial last year, but didn't use it because I thought the bobbins were too small. After seeing them again on Sandy's blog, I said to myself "Self, how about you make them BIGGER?!" I don't know if it's good or bad, but this time self *did* answer back: "Great idea!" So me, myself, and I set to work to draw a larger, faster, stronger (wait, that's a TV show)... a larger bobbin.

I figured while I was making a few, I might as well create a tutorial! This is a great way to use up those fabric scraps and recycle cardboard. In addition to storing lace, these could be used for ribbon, trim, cording, etc.


SUPPLIES

° Tacky glue
° Thin lightweight cardboard (cereal boxes, posterboard, etc.), or cardstock
° Scissors to cut above mentioned cardboard
° Fabric
° Fabric scissors
° Binder clips, or clothes pins
° Wet washcloth, and dish to put it in
° Crop-a-Dile and eyelets (optional)
° Iron (optional)


DIRECTIONS

Step One:
Create your pattern. Originally, I started with a paper pattern but I didn't like how flimsy it was so then I traced the pattern onto cardboard. My pattern is about 4 1/2"H x 4"W. You can make it any size you want.


Step Two:
Trace your pattern onto cardboard or cardstock. I used lightweight cardboard because I wanted mine sturdier and I'm not sure how sturdy cardstock is. You will need two patterns for each bobbin you want to make.


Step Three:
This step reminds me of grade school art class, LOL! Cut out the bobbins using the scissors made for paper only. Do not, I repeat... do not use sewing scissors. You'll dull the blades terribly. The scissors I used are my kitchen scissors.


Since I drew my original pattern freehand, it's not exactly semmetrical so I marked the top of each bobbin with a "T".


Step Four:
You will also need two pieces of material slightly larger than your bobbins. If the fabric is wrinkled, iron it.


Step Five:
With the fabric face down, place the cardboard bobbin on top and trace the shape onto the fabric about 1/4" larger. There's no need to be precise about it. I used a highlighter marker to draw on the fabric. Any thin marker will work for this. Do this with both pieces of fabric.


Step Six:
With the sewing scissors, cut the fabric on the lines you just drew to make it the shape of the bobbin.


Step Seven:
Now comes the fun part. Glue!! As you can see from the photo, I like to keep my glue bottle upside down. That way I don't have to shake and shake to get the glue to the tip. Upside down, it's already there! I use Tacky Glue because it's really sticky but yet items can be repositioned if need be.

This is also why I keep a moist washcloth nearby... to wipe my fingertips while gluing.

This is not the only way to do it, but here's the procedure I used:
1. Glue opposite ends and sides first, checking every now and then to make sure the fabric is flat on the front.
2. Clip the fabric for the inside corners to make it easier. A small pair of embroidery scissors works great for this. Then glue the inside corners.
3. Last, glue the outside corners.
4. Keep the fabric very tight around the edges of the cardboard.
5. I didn't clip around the curved edges, but you might find it easier to do so. I simply just eased the fabric around them.

(P.S. The photos do *not* follow the "procedure", I figured out the procedure afterwards with trial and error.)

This is what they should look like when you're done gluing the fabric to the cardboard.


Step Eight (Optional):
If you have a crop-a-dile and would like to put eyelets on your bobbin, this is when to do it.

Using the crop-a-dile, I made a hole in my pattern to use as a guide. Then I placed the pattern over the fabric covered bobbins before punching the hole. Add the eyelet and you have these:


Step Nine:
More glue! Put a bead of glue about an 1/8" around the perimeter of one bobbin. Be careful not to put too much. Then squiggle glue around the center.


With wrong sides toward each other, sandwich the bobbins together. Make sure eyelets and edges match up as close as possible. Secure the edges with binder clips or clothes pins. I like binder clips because they're so strong. Doesn't that remind you of a Frankenstein experiment? LOL

After the glue dries (about an hour or so), remove the binder clips. Viola! Bobbins to store your lace.

Jul 31, 2009

Mailart Tutorial

A while back, I taught an online Mailart class. My sudents were absolutely wonderful and did a great job on their mailart envelopes. You can see their handiwork HERE.

Supplies
• Paper
• Pencil/Eraser
• Scissors
• Ruler
• Sewing Machine
• Iron
• Aida, Evenweave, or Aida
• Contrasting floss
• Cotton Fabric for envelope lining
• Coordinating sewing thread
• Iron-on interfacing/stabilizer
• Snaps or iron-on velcro dots
• Decorative buttons (optional)


STEP ONE:
Determine the size envelope you want. Mine is approximately 4 1/2" tall by 5 3/4" wide. (You can make it whatever size you want.)


On a piece of paper, draw an envelope pattern. It will be twice as tall as the envelope you want to create, plus an extra 1 1/2" to 2" for the envelope flap. Using scissors, cut out pattern.


Place the pattern on top of the fabric you'll be stitching on. With the contrasting thread make a running stitch around the pattern. Also stitch the lines where the envelope will be folded. Be sure to make the fabric 1/2" larger all around the size of the paper pattern for the seam allowance.

The top section is the envelope flap. The middle section is the front side of the envelope. The bottom section is the back side of the envelope. (Image is clickable to see a larger photo)


STEP TWO:
Using pencil and graph paper, draw out your sender's address and your return address. One square will equal one stitch on your fabric. If you don't have graph paper, Incompetch has an excellent graph paper generator.


Once you have the addresses graphed out, backstitch them onto the front of the envelope using a contrasting floss color. Be sure to keep your flap at the top when you're stitching your addresses. I recommend using a dark color so the post office can read it without problems.


STEP THREE:
Decide on what pattern you want to stitch on your envelope. Remember to leave space for the stamps (and the overseas customs tag, if applicable), but other spaces on the fabric is fair game. Choose designs that have small motifs and/or border designs. Or, you could choose a small portion of a larger design. If you'll be stitching on the front of your envelope, be sure it will fit in the space leftover after you backstitch the "To" and "From" addresses.

IMPORTANT NOTE: If you plan on stitching on the back side of the envelope -and- your design has a right side up, you will need to stitch the design upside down in order for it to be right side up when constructing the envelope. So remember to flip your fabric around if stitching on the back of the envelope.

Stitch your motifs, borders, designs, etc. Be sure to stay within the running stitches you did in Step One. This is not the time to "color outside the lines", LOL.

Examples of Finished Mail Art can be seen HERE and HERE.


STEP FOUR:
Cut out a piece of lining fabric and 2 pieces of interfacing the same size as the stitched envelope piece.

I used Pellon Peltex 950F interfacing. I got it from JoAnn Fabrics. It's pliable and easy to work with. Do NOT get the iron-on interfacing that is thick as thin cardboard. You will have a heck of a time working with it. If you hold it at one end and it doesn't bend on its own, it's not the right stuff.

Iron one piece of your interfacing on the wrong side of your stitched piece and the other piece of interfacing to the wrong side of your lining fabric. Follow the directions given for your interfacing. Now is a good time to attach any decorative buttons, snap closures, or ribbon you wish to use to keep your envelope flap shut. (I used iron-on velcro dots)

Place fabric and stitched piece, right sides together, then stitch 1/4" seam around the edge (using your basted line as a guide), leaving at least a 2" opening to turn right side out.


(Photo shows only stitched piece and lining,
not the interfacing attached)


In order to have square corners, it's better to start the seam allowance stitching in the center of one of the sides. Remove your basted lines and turn right side out. Press the wrinkles out. Then whipstitch opening closed.


STEP FIVE:
Fold the envelope into shape, and press the folds.

Whipstitch the sides of the envelope.


After putting contents into the envelope, whipstitch the flap shut (Be sure to tell the recipient to cut the whipstitches in order to open the envelope.


Design: Tea Crazy*
Designer: Lizzie Kate
Fabric: 32ct Antique White Monoco Evenweave
Fibers: DMC Linen Floss
Time: It took about 2 weeks to plan the
envelope design, and 2 weeks of stitching.


MAILING TIPS:
• Glue (I used superglue) the stamps onto the front of the envelope to be sure they stay secured.
• Have the postal clerk hand-cancel the postage stamps to reduce any risk of the MA being damaged.


*Design and colors were altered from original chart design.

©2009 All rights reserved.

Aug 18, 2008

Flatfold Tutorial

Just what IS a "flatfold" anyway?

My answer: It’s a finishing technique used to display stitched projects. It’s easel-shaped, stand-alone design is an alternative to framing.


Ever since I taught an online Needlebook Class, my students have been prodding encouraging me to teach another online class. So I came up with my second interactive tutorial class for flatfolds. You can see photos of the finished flatfolds HERE.

If anyone uses my instructions to create a flatfold, I'd love it if you sent me a pic so I can add it to my album. :)

Here's my step-by-step instructions for creating a flatfold:


Materials Needed:• A stitched piece at least 4 1/2" by 4 1/2" in size. It can be bigger, even up to 5" by 7" or a little larger. Personally I think anything smaller than 4x4" will be difficult to work with.

• Coordinating cotton fabric of your choice. You'll need a little more than 4 times the size of your stitched piece, so calculate yardage accordingly. I've found that the quilt flats (18x22" fabric) are perfect. Or look in the odds and ends bin at the fabric stores to see if there's anything that might work.

• Lace, ribbon, or cording

• Flat quilt batting - again, the amount depends on size of your stitched piece. You'll need 4 times the size of your stitched piece. I used "Soft & Bright Needled Polyester Batting", Craft Size 34x45" from JoAnn Fabrics.

• 4 pieces of thin, but sturdy cardboard. Approximately the size of your stitched piece. (See Tips at the end of the tutorial)

Small binder clips, spring clothes pins, or something similar.

• Ruler

• Craft Tacky Glue (regular white glue won't be as easy to use)

• Scissors

• Craft Knife

• Pencil

• Iron and Ironing Board


STEP ONE:
Once your piece is stitched, wash and press it.

Determine how big you would like your flatfold to be. My stitched piece is approximately 5 by 5" and I decided that I wanted my flatfold to be 6 by 7.25". After deciding what size you want your finished flatfold to be, add 1" to each side. So fabric size would be 8 by 9.5".


Use the ruler to measure out four cardboard pieces to the size of your flatfold. It's important that all the cardboard pieces be the same size! Use the craft knife with a cutting mat underneath to cut the cardboard pieces.


TIP: Once you've drawn your lines on the cardboard, use the craft knife to score (cut a light line) over your drawn lines. You don't have to press hard, just hard enough to cut a bit through. Go slow the first time. Then go over it again a bit harder, and possibly a third time until it cuts all the way through. Sometimes, I will place a ruler along the drawn line and run the craft knife along the edge of the ruler.

Cut four pieces of batting approximately the same size as the cardboard. A little larger won't matter because you can trim it off later.


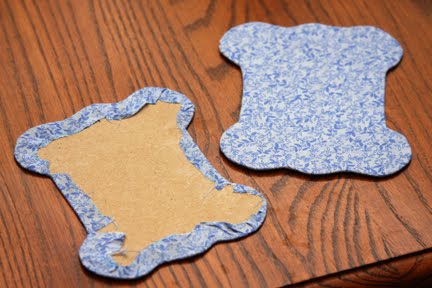
Cut two pieces of fabric approximately 2" wider and taller than the cardboard. This means your fabric will be 1" wider than the cardboard on all 4 sides. For my FF, the fabric size would be 8x9.25".

Cut the third piece of fabric the same width as the other two and 4-6" longer. The length would depend on the height of your FF. For my FF, the size would be 8x13.5".

Cut your last piece of fabric 3" wide by 10" long. Use a ruler to make sure it's 3" wide the entire length. This will be helpful later on.


Using the steam setting on the iron, press your fabric pieces so there are no wrinkles or fold marks. If needed, press your stitched piece (on the back side, face down on a towel).

As you can see, I wasn't too concerned about the accuracy on cutting the batting and fabric. The cardboard pieces all should be the exact same size, though!


STEP TWO:
Using craft glue, glue one piece of batting to each piece of cardboard. After gluing, if batting is larger than the cardboard, trim it so that both are the same size.


STEP THREE:
Glue the two smaller pieces of fabric to the batting, cardboard. Place fabric face down. Place cardboard on top,centered, with batting side down. I know a lot of people have difficulty with the corners. I've found it easiest to glue the corners first.


Then glue opposite sides of cardboard. When gluing, use care to keep the fabric at the corners snug and tight. You might want to keep a damp cloth nearby to wipe your fingers because the glue will seep through the fabric.


Place your stitched piece face down. Place cardboard on top, centered with batting side down. Glue it the same way as previously mentioned. A helpful tip: Sometimes heavier fabrics are harder to keep in place until the glue is dried. Use straight pins to to hold the glued fabric, especially at the corners.


Glue the final piece of fabric (the one with the extra 6") to the cardboard/batting the same as the rest, leaving the 6" overhanging. Do not glue that part to the cardboard. I usually put a small amount of glue between the folded over fabric layers so that they lay nice and flat. I also make the folds so that both sides angle slightly toward each other at the end opposite of the cardboard. Doing this will eliminate a possible overhang of fabric later. From now on, I'm going to refer to this as the "flap".


NOTE: If your stitched piece is less than 6" tall your flap does not need to be 6" long. The flap should be about 1/2 to 2/3 as long as your sitched piece.


STEP FOUR:
Place the piece with the flap on table with fabric facing the table, and wrong side facing up. Put glue on the flap. Place another fabric covered cardboard on top of the flap, wrong side face down. The sides of the flap should be angled in so that you don't see the material close to the edge. Be sure that the ends are butted up tight against each other. Let dry.


STEP FIVE:
Take the 3" wide piece of fabric and place right down on the ironing board. Bring each long edge to the center and press.


Spread a small amount of glue on the wrong side of the fabric to hold the fabric flat in the center. Use only a small amount of glue down the length.

NOTE: If you want to put lace or piping border around your FF, now would be a good time to do that. Glue your lace/piping to the backside of the stitched piece around the edge. I always start gluing at the center bottom edge because it's less noticeable when the two ends come together. If you're using piping, you may want to notch the piping material (not the piping itself) at the corners so that they ease around them better.


STEP SIX:
Glue the strip to the bottom edge of the hinged fabric piece created in Step 4. The strip should be glued with the center cut facing up. Let dry.


STEP SEVEN:
Glue the last fabric-covered piece of cardboard to the hinged piece, on the side that you just glued the strip onto. Wrong sides should be facing each other. Use clothes pins or binder clips to hold them together until the glue dries. For a neater finish, place the glue close to the edges of the cardboard.


STEP EIGHT:
Take the left side and fold it toward the right side. Take the strip and glue it to the top of the (left) side you just folded over. You may need to trim the strip if it's too long. Let dry.


STEP NINE:
Glue the stitched piece to the front of the of the easel you just created. Wrong sides should be facing each other. Use clothes pins or binder clips to hold them together until the glue dries. For a neater finish, place the glue close to the edges of the cardboard. Let dry for 24 hours.


STEP TEN:
Once the glue is dry, you can glue cording, ribbon, or string beads around the edges. Or you can add pins like a pinkeep.

As you can see, I chose to add cording to mine. Straight pins help to keep the cording in place while the glue is drying.


Design: Peace On Earth
Designer: Linda Stolz
Fabric: 10ct gray aida
Fibers: mini suede, perle cotton,
overdyed, fuzzy stuff, fyreworks
Embellishments: Mill Hill glass stars


Congrats on making your flatfold!


Suggestions:
There have been numerous questions as to what kind of cardboard to use.

I'm big on recycling, so I use the thin sturdy cardboard that comes with paperstock at work (It just gets thrown away anyway).

You could also use scrap pieces of mat board. Places that do framing would be happy to sell you small pieces really cheap.

One of my students, Joy, recycled cereal boxes. She glued the pictorial portions together. Depending on how large the flatfold is, one may choose to add a third layer. She also glued together some cracker boxes (Townhouse) and says the strength is pretty good.

Several people have tried corrugated cardboard and the results weren't very good. It makes a flatfold very bulky and the edges not very neat. So if you can find an alternative, try to avoid using it.

©2008 All rights reserved.