
From what I've researched and heard from other people, the concrete base crumbling is a common problem with floor lamps.
Seeing as I've had my lamp for about seven years, I'd say it held up pretty well. As readers may recall, the base of my lamp fell out a few weeks ago.


So, I set about figuring out if it could be repaired. I ordered a 10lb. bucket of vinyl concrete patch and went to work. It was around $8 with free shipping to the store.

Before doing any repairs on electrical appliances, always unplug from the electrical source. In the case of my lamp, I also removed the bulb.

I removed the remaining concrete from the base of the lamp and set to work.


I made a template by tracing the base of the lamp onto a piece of cardboard. I used a cereal box, but any thin cardboard would work.

Using a hole punch, I marked spots where I wanted anchors to be placed in the bottom of the lamp. I then traced the template onto a scrap piece of 3/8" paneling.

Using a jigsaw, multi-tool, and drill, I cut out the new base for the lamp.

I marked the front of the piece with an "F" so that I knew which end was which.

I turned the lamp upside down and placed it in a clamping workbench. I got mine really inexpensively a few years ago... I think I paid $15. It comes in handy! If you don't have one, you could always find a corner to prop the lamp up in.

The nice thing about my little workbench is that is has notches to keep round pieces in place.

The little workbench also folds up for easy storage.

There were two screw sockets that held the previous concrete piece in the base. I put some new screws in the sockets.

Next, I measured the depth of the base and created a form out of another piece of thin cardboard to surround the electrical components of the lamp.


Then, I made sure the lamp was level clamped into the workbench.

Following the manufacturer's instructions, I mixed up the vinyl concrete and put it into the base of the lamp using a paint stick. A trowel would work fine, too. (Or, any small utensil)

See the holes in the concrete? I placed the wood base on top and used a skewer to make the holes. I pushed small anchors into the holes.

After the concrete cured, I pulled out the cardboard form. Since I wanted the concrete to have a bit more anchorage in the base, I made a smaller form and filled the end around where some previous concrete was. I was careful not to get the small wiring in the concrete.


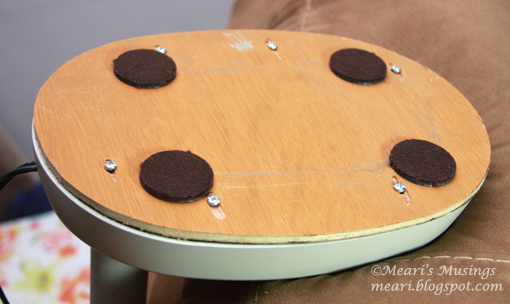
The wood base was then attached using the screws and anchors. I should've used flathead screws. Since I didn't have the right size, I used the round headed ones I had on hand.

I have wood floors, so attached felt pads to the bottom of the base so the screws wouldn't scratch if I moved the lamp around.
I was really disappointed when I plugged the lamp in and it didn't work. I thought, "All that work and now it won't light up!" Turns out, I hadn't pushed the light bulb in the socket far enough, LOL. It works fine!
I think the lamp is more stable now than it was before the original concrete fell out. I'll be curious to see how long the repair lasts.

Cost of repair:
• $5 for vinyl concrete. I bought a 10 lb. bucket and only used half.
• $2 for felt pads
• The rest of the scrap wood, anchors, screws, and cardboard I had came from my stash.
Satisfaction from DIY = Priceless!
~ Not to mention the cost savings from not having to buy a new stitching lamp :) ~


13 comments:
WOW! Great job on fixing your lamp. I wouldn't have known where to start on this. Excellent tutorial. :)
Way to go, Meari! Great solution without having to purchase a new lamp!
Wow great job my dear
Well done x
I KNEW you would solve this! Way to go Meari!!
Oh my goodness Meari!! What a great job you've done! I would NEVER have the patience to do this!
There are no words with how impressed I am by you!!!!
Great Job !!! I'm bookmarking this one, it may come in handy one day with my OTT light.
You are amazing!! Great job!!!
Awesome! You did pretty much the same thing we did, except you had success. I'm going to look for one of those workbenches. There are so many times I've needed something like that and since it folds up, I can hide from Hubby so he doesn't steal it for his own use, lol.
Great job Meari! I have that same lamp but hope I won't have to make this repair anytime soon!
You are amazingly creative! I have one of those lamps where the black plastic cover is flaking off -- when the concrete base falls out, I'm sending it off to you for repair. Love your flat folds -- do they require a sewing machine to make? I'm allergic to sewing machines! Judi in Phoenix
Yay for your lamp repair! :) Good job.
Karin in CA
Great job, it is indeed priceless:)
Post a Comment