Feb 27, 2012

Marvelous Monday Update 2/27/12

WEATHER
My area received 7" of heavy, wet snow last Thursday night. I spent 3 hours shoveling and snowblowing. I was sooooo sore and tired by the time I got back into the house.


This is what the pine tree in my front yard looked like. Yesterday, temps were in the lower 40's and a lot of the snow has melted. Have no doubts... more is coming this week.

STITCHY STUFF
I finished the 9 o'clock rock garden and cherry branches! Here's what it looked like at the beginning of the month:


Unfortunately, I had to do some frogging of the cherry branch ice crystals. I originally used the wrong color! Talk about a tedious process of frogging. Ugh.

Here's what it looks like now:

Other WIP photos can be seen HERE.

Feb 22, 2012

Blossom Splendor


When I hand-dyed the fabric for Blossom Splendor, I wasn't sure I was going to like how dark the yellow turned out. As time went on, it blended in really well. WIP pics can be seen HERE.

She is finally finished! I'm holding off on framing her until I get the Blue Geisha stitched as I want them to have matching frames. But L@@K! Isn't she gorgeous??!

Blossom Splendor
Designer: Joan Elliott
Fabric: 28ct Hand-Dyed Jubilee Evenweave
Fibers: DMC
Embellishments: Beads
Started: Dec 31, 2010 ~ Finished: Feb 21, 2012

Le Jardin Pourpre in Aubergine

When I picked up this artwork at the thrift store for $3.99, the clerk gushed on and on about how cute it was. I tried to tell her I was buying it for the frame, and she asked: "But, isn't this cute?" Uh, yeah if I lived on a ranch... it'd be perfect.

I decided to go with Aubergine for the frame. It really brings out the dark purple stitches in Purple Garden.

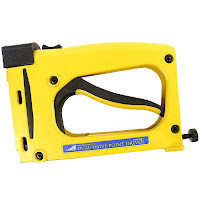
I was getting peturbed at the Logan point driver. This is the only the third time I've used it. The first two times, it worked just fine. This time it wouldn't shoot the points consistently, and they kept getting jammed. After spending an hour trying to get the thing to work, I looked online for help. According to some reviews, I found out this is a known problem. I've contacted Logan and they are sending me a replacement (I have to send my faulty one to them at their cost). It should be here by the end of this week. I'll reserve my opinion of the product until after I use the replacement a few times.

Despite my framing "issues", I am really pleased with the final result:


Le Jardin Pourpre (Purple Garden)
Designer: Angie SB, from Argentina
Fabric: 28ct Charles Craft Dusty Rose Monoco
Fibers: DMC
Started: Oct 5, 2011 ~ Finished Dec 9, 2011
Size 14 x 17"
Framed: February 19, 2012


As I mentioned in a previous post, I plan on hanging Purple Garden in my bedroom. Out of all the rooms in my house, I think it fits with the decor best in that room.

Feb 21, 2012

TUSAL 2/21/2012

It's amazing how much stitching I get done when I don't have to study!


I'm doing really great for the 2012 Totally Useless SAL coordinated by Daffycat.

My jar contains threads from:
• Japanese Garden... pretty pastels and sparkly #4 Krenik braid
• Snow Ornament... varigated blue green
• Blossom Splendor... blues and lots of sparkly #4 Krenik braid

Feb 20, 2012

Marvelous Monday Update 2/20/2011

GIVEAWAY
Victorian Motto Sampler Shoppe is hosting another giveaway! Click on over to see what it's all about.

STITCHY STUFF
Coming up with the perfect frame is a fun challenge! I scour thrift shops searching for the right size and "look". More often than not, the frames I find are solid wood and can be refinished to look gorgeous! Remember the frame for ABC Lessons?

I saw this frame and had an inkling it would be perfect for Purple Garden. If you look close, you can still see traces of the gold finish. I didn't work too hard to get it all off since it will be primed anyway.

Now comes the fun part! I've decided PG will hang in my bedroom since it won't fit into the decor of my living room. A trip to (where else?) Menards yielded a purchase of Aubergine paint that matches one of the two purple colors on my comforter. I painted this frame with the Aubergine (for another project).

Or, I could use the Expresso paint like I did for ABC Lessons:

Aubergine... Expresso... Aubergine... Expresso. Which shall it be?

The is stitching done for Blossom Splendor. Woo Hoo!! I was diligently working the Kreinik pattern on the obi when guess what?!? I used the entire spool. I ran out of Kreinik!! Wahhhhh. Here's a close up of the "shinies":

The photos don't do the embellishments justice,
but they're clickable for a larger view.


STITCHY GADGETS


For beading of Blossom Splendor, I used the bead nabber. I like that it holds 5-10 beads on my finger tip while I have my threaded needle in my other hand.


A while back, Rachel from What Looks Like Crazy posted about how JoAnn Fabrics resurected "Jammers" cases from yesteryear. It seems JoAnn's is already sold out on them. While I was shopping at Hobby Lobby this past weekend, look what I found:

Creative Options
Double-Sided Thread Organizer
by Plano Molding Co

They are exactly the same ones sold by Walmart years ago for less than $6. I know, because I've been storing my DMC in them.

The price is considerably higher now at $12.99. Back then, they were used to store 1/24 scale Matchbox/Hot Wheels cars and found in the toy department. Now they're purported to be used to store spools of sewing thread and found in the sewing department. With the HL 40% off coupon they're much more reasonable.

You can also find them at:
Hobby Lobby Online
Walmart Online
Connecting Threads
Plumbers Surplus

Feb 13, 2012

Marvelous Monday Update 2/13/12

Last week some of you asked about the supplies I used for my Sew A Mystery box, and where I got them. As I mentioned in the post, I got the fabric from JoAnn Fabrics. It was one of those fat quarters. The box came from Hobby Lobby. It was only a couple of dollars. It looks great painted, not so great stained. Also, I sanded the box really smooth before priming and painting. I used Rustoleum spray paint in the color Expresso. I did not put a clearcoat over top of the paint as I've never seen a need to on any of my painted projects. The lace trim was from my stash. I only had a short piece of it so I'm not sure where I got it from. Probably from one of my thrifting adventures. Other things I used: batting, crochet cotton (for lacing), tacky glue, and cardboard.

Lee from Lakeside Stitcher is writing about her favorite things during the month of February. One of her favorite things is my needlework box! You can see it HERE.

I stitched and finished my February ornament last week. It didn't turn out as puffy as I anticipated, but I do like how the beading turned out.


Snow
Designer: Whispered by the Wind
Fabric: 14ct Baby Blue Aida
Fibers: DMC 4025
Embellishments: Ribbon & Beads


My birthday celebration continues with more BFC cards from the Chatty Stitching Exchangers and Stitching Sisters:

Here's ALL the cards I received this year:

Again, a big Thank You to all the BFC'ers!

Even though I didn't finish it, I made good progress on Blossom Splendor. So close... so, so close!


Whew! That's a lotta stitchy updates.
Until next time,

Feb 10, 2012

Organizing Fool! {Ribbon Storage}

Yikes... Over the years, my ribbon and trims stash has exponentially exploded. I started out with one plastic box like this:


It worked well when my ribbon stash was confined just to one box. Everything was organized by color. No problem. At a glance I could pick out the size and color I needed. Then it turned into this:


Not so easy to peruse when looking for just the right embellishment! Searching the web gave me lots of ideas. Lots and lots of cute, adorable ideas.


My problem with these is that I like my craft stuff organized and protected from dust and accidents (just waiting to happen). I don't like the idea of having dangly ribbons hanging out holes, or mounted on rods. What a pain if I needed to take out the entire roll of ribbon. I wanted to do something to reduce the amount of space my ribbon stash was taking up. (No, getting rid of it was no an option, LOL) Being on a thrifty kick, I also wanted to see if I figure out a solution with things I had on hand.

I did take some inspiration from this:


On several scrapbooking forums, crafters talked about the Cropper Hopper Spools and Clips. Doesn't that bobbin look familiar? Can you see the light bulb going off in my head?

Since I wind my DMC on bobbins, I thought "Couldn't I do that with ribbon?" Like in the basket above, only separate like the CH spools. The CH clips didn't trip my trigger, though... adding extra bulk and what if the ribbon was too thick? Would the clips hold?


Do you know dollar stores are a great source of inspiration? Oh yeah! Look what I found for just (I'm sure you guessed) one dollar?!?


This is what I came up with!


I took scrap mat board and cut rectangular pieces. I labeled and wound the ribbon on each one. After winding a few of them, I realized how much space those round spools were taking up!


I made two size bobbins. For 1/4" widths and less, I used 2 x 2 3/4". Larger sizes, I used 2 x 4 1/4".


With the exception of a half dozen wide ribbons, all of that stash mess I had fit into ONE small drawer! How awesome is that?


To keep the ribbons nicely held in place, that's where my dollar store find came into play. One hair band wrapped around each bobbin keeps it neat and tidy.


I found these cute little containers in a box I have for misc do-dads.
Perfect, don'tcha thing?

To organize my ribbon stash, all I spent was $1 and two evenings worth of time. Everything else I had on hand.


P.S. I had 100 bobbins of ribbon and trim in my one drawer.


Pin It


Linked up to:
Remodelholic

Feb 7, 2012

Sew A Mystery

What do you get when you combine this:


and these?

A well deserved HAPPY DANCE is what!

I took part in a mystery SAL last year. It was my first SAL, and Carol at iStitch did a wonderful job designing and monitoring the projects.

My project was fraught with high drama (I might be slightly exaggerating...). As I’ve said in previous posts, I had misgivings about the variegated floss color I chose. Even so, I forged forward and finished the stitching.

For the past couple months, I’ve been trying to finish-finish it. Finding a coordinating fabric that I could tolerate liked was interesting to say the least. JoAnn Fabrics doesn’t offer much of a variety in the way of small print fabrics.

Next, I started out staining the box a nice maple color. The cheap @ss cute little box wouldn’t stain evenly no matter what I tried. Finally, I decided to paint it Expresso ~ the same color I used on the frame for my LK ABC Lessons. Ahhhh... mucho better!

Then, I sewed together the pin pillow. I inadvertently stitched it on a piece of linen slightly smaller than I should have. When I “installed” it into the box, there were gaping trenches around the entire thing. Gawd! What to do, what to do? Cover it up, that’s what! Cover it up, I did.

As an afterthought, I went back to Carol’s tutorial that she so graciously put together. Ack! She said not to overstuff the pillow. Guess what I did? Yep, I overstuffed. Since I’d already glued the thing in the box, there was nothing to be done to resolve the case of the chubby pillow.

I’m glad I stuck with this project because I really do like how it turned out. Behold...

Designer: Carol at iStitch
Fabric: 22ct Zweigert Linen
Fiber: Anchor 1315
Embellishments: Ribbon Trim

Despite the trials and tribulations, an awesome finish emerged!

Until next time,