
I saw this tutorial last year, but didn't use it because I thought the bobbins were too small. After seeing them again on Sandy's blog, I said to myself "Self, how about you make them BIGGER?!" I don't know if it's good or bad, but this time self *did* answer back: "Great idea!" So me, myself, and I set to work to draw a larger,
I figured while I was making a few, I might as well create a tutorial! This is a great way to use up those fabric scraps and recycle cardboard. In addition to storing lace, these could be used for ribbon, trim, cording, etc.
SUPPLIES
° Tacky glue
° Thin lightweight cardboard (cereal boxes, posterboard, etc.), or cardstock
° Scissors to cut above mentioned cardboard
° Fabric
° Fabric scissors
° Binder clips, or clothes pins
° Wet washcloth, and dish to put it in
° Crop-a-Dile and eyelets (optional)
° Iron (optional)
DIRECTIONS
 Step One:
Create your pattern. Originally, I started with a paper pattern but I didn't like how flimsy it was so then I traced the pattern onto cardboard. My pattern is about 4 1/2"H x 4"W. You can make it any size you want.
 Step Two:
Trace your pattern onto cardboard or cardstock. I used lightweight cardboard because I wanted mine sturdier and I'm not sure how sturdy cardstock is. You will need two patterns for each bobbin you want to make.
Step Three:
This step reminds me of grade school art class, LOL! Cut out the bobbins using the scissors made for paper only. Do not, I repeat... do not use sewing scissors. You'll dull the blades terribly. The scissors I used are my kitchen scissors.

Since I drew my original pattern freehand, it's not exactly semmetrical so I marked the top of each bobbin with a "T".
 Step Four:
You will also need two pieces of material slightly larger than your bobbins. If the fabric is wrinkled, iron it.

Step Five:
With the fabric face down, place the cardboard bobbin on top and trace the shape onto the fabric about 1/4" larger. There's no need to be precise about it. I used a highlighter marker to draw on the fabric. Any thin marker will work for this. Do this with both pieces of fabric.

Step Six:
With the sewing scissors, cut the fabric on the lines you just drew to make it the shape of the bobbin.
Step Seven:
Now comes the fun part. Glue!! As you can see from the photo, I like to keep my glue bottle upside down. That way I don't have to shake and shake to get the glue to the tip. Upside down, it's already there! I use Tacky Glue because it's really sticky but yet items can be repositioned if need be.
 This is also why I keep a moist washcloth nearby... to wipe my fingertips while gluing.
 This is not the only way to do it, but here's the procedure I used:
1. Glue opposite ends and sides first, checking every now and then to make sure the fabric is flat on the front.
2. Clip the fabric for the inside corners to make it easier. A small pair of embroidery scissors works great for this. Then glue the inside corners.
3. Last, glue the outside corners.
4. Keep the fabric very tight around the edges of the cardboard.
5. I didn't clip around the curved edges, but you might find it easier to do so. I simply just eased the fabric around them.
 (P.S. The photos do *not* follow the "procedure", I figured out the procedure afterwards with trial and error.)
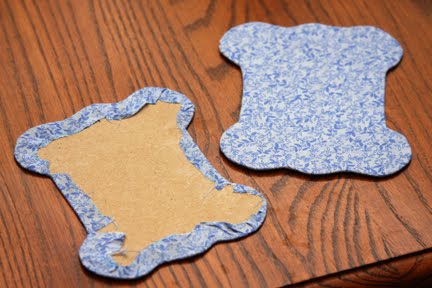
This is what they should look like when you're done gluing the fabric to the cardboard.
Step Eight (Optional):
If you have a crop-a-dile and would like to put eyelets on your bobbin, this is when to do it.
Using the crop-a-dile, I made a hole in my pattern to use as a guide. Then I placed the pattern over the fabric covered bobbins before punching the hole. Add the eyelet and you have these:

Step Nine:
More glue! Put a bead of glue about an 1/8" around the perimeter of one bobbin. Be careful not to put too much. Then squiggle glue around the center.

 With wrong sides toward each other, sandwich the bobbins together. Make sure eyelets and edges match up as close as possible. Secure the edges with binder clips or clothes pins. I like binder clips because they're so strong. Doesn't that remind you of a Frankenstein experiment? LOL
After the glue dries (about an hour or so), remove the binder clips. Viola! Bobbins to store your lace.


24 comments:
Very interesting and it looks like a fun project too! Thank you for the tutorial. I might give it a try since I have lots of ribbons in my stash.
socialsue
Those are really pretty, Martha, I mean, Meari! :)
Awesome idea Meari! I just might need to do that. I have a huge lace stash too.
Christine
Great tutorial, Meari. Thanks for sharing.
Ooh, lovely Meari - could easily be worth creating a lace stash for...
Neat idea Meari, I don't use bobbins for my floss but the lace idea is great.
Rebecca
Great tutorial Meari - thanks for sharing!
Great tutorial, Meari! I still need to get myself a crop-a-dile tool.
Nice tutorial. Of course, now I need to get one of those Crop-a-diles for myself. :^)
Very cool!!
Beautiful bobbins Meari. When it comes to so many things you are truly gifted. You make such pretty things.
Thanks for the tutorial too. I am glad all is in order again at your house.
Tina
They turn out so nice! :)
The bobbins are beautiful!
Sandy P.
Love the bobbins!
Cute bobbins. You are very creative.
What a great idea Meari. It's one of those "Why didn't I think of that!" ideas. That'll work great for bits of yarn, cording, elastic or anything else that comes in strings!
Thanks,
PennyB
That was nice idea and great work. Those looks lovely and maybe I have time to do few someday.
Tinna
they look awesome Meari! You are so creative!!!! Great job!
Shari
Meari! You are soooooooooooo creative girl! I love them; you did a fantastic job. You could actually have a business of your own, with all the handiwork that you do! You are THE 'tool time lady' of the year; you are so crafty with all of your crafts and home repairs!!!!!! I am in awe of everything you do!
Hugs,
Sue
Meari -- I love your lace bobbins!!!
Anita
What a neat idea. I just gave away most if not all my lace. LOL
Hugs,
donna
Meari, your bobbins looks great!
Virpi from Finland
Many thanks for the tutorial Meari, have saved it to my computer for future reference. I have a container full of lace and it always looks untidy. Maybe that is why I have a lid on it to keep it covered!
Suz
great idea!
Post a Comment