Apr 14, 2013

Cuppa Please?

A while back I picked up a small shelf that was scratched up and was in need of a little TLC.  I took it apart and filled the scratches.  A bit of paint...


and I have a beautiful display shelf for my teacup collection:

 
Cost Breakdown...  Shelf: $3.49, Expressso paint from my stash (love that color!), Silver paint from my stash, and a bit of labor.


Linked Up To:


Bloglovin

Follow my blog with Bloglovin

Since Google Reader will be dust before too long, I've switched my reader to Bloglovin.  It allows you to create categories just like GR.  The other thing I like is that Bloglovin sends an email with all the new blog posts that you set up in reader.  This allows me to see at a glance what's 'new'.  I have my email set up with a filter that sends those emails to its own folder.  The only thing it doesn't do is allow you to rename blog titles in the reader.  That feature was helpful to me in that I'd put the person's name along with their blog name.  It helped me to remember who went with what at a glance.

Apr 8, 2013

Marvelous Monday Update 4/8/13


Marvelous Monday... maybe, if I had gotten enough sleep last night. I don't know why, but I just couldn't get to sleep! I read, tried to count backwards (usually a sure thing), and even got up to watch a movie with the sound wayyy down low. I finally went back to bed around 1:30am. The alarm goes off at 5am. Ugh!


STITCHY STUFF
I finished all the details in Yuku's hair as well as the upper part of the kimono collar... lots of backstitching and French knots. While working on her, I kept up with decades of tradition by watching the Peanuts Easter "specials" and caught the Fat Albert Easter special as well. Hey, hey, hey!


Last week, I had stopped at a consignment shop and picked up a Patriotic chart and frame for $4. Turns out the chart sells for $6 and the frame is a special order for $20. What a great deal!


Welcome To My Home is coming right along. It's the project I work on during my lunch hour. Here's what it looked like before:


Here it is with a bit more progress:


I've even worked on Japanese Garden. I am almost at the 1/2 point! Here's what it looked like before:


And now:


GIVEAWAY
Carolyn at Taking One Stitch at a Time is hosting a summer humbug giveaway. Click on over and check it out.

STASH FOR SALE
I've been meaning to do an update for ages! I found a few things in my stash that I'm putting up for sale.

Set of 4 Acrylic Coasters
$5


Mill Hill Beaded Kit
$4

Martha Stewart Double Craft Punch
$10
SOLD!

Click HERE for other goodies.
 
If you're interested in anything, drop me an email
and I'll get a postage amount for you.

Apr 5, 2013

Couple of Giveaways

Beth from Summer House Stitch Workes is hosting her first ever blog giveaway.

Ruth at Little Leprechauns is celebrating her birthday with a giveaway.


Both giveaways end on Sunday, April 7th!

Apr 2, 2013

Oreo BonBons

These are so easy to make!


OREO BONBONS

Ingredients:

1 pkg. Oreo Cookies
1 pkg. (8oz) cream cheese, room temperature
1 pkg. chocolate or vanilla bark/candy coating

Directions:
Crush the Oreo cookies. You can do this one of two ways: 1) Put a bunch in a ziploc bag. Close the bag and use a rolling pin to crush them into the smallest bits you can. The finer, the better. 2) Use a food processor or blender. I used a food processor and it takes no time at all to finely crush up an entire package of cookies. Oh, don't forget to eat a few while doing it... just to make sure they're OK. ;-)
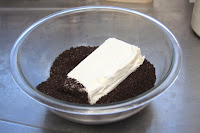
Next, put the crushed oreos in a large bowl. Add the cream cheese and mix together really well. I recommend using your hands and smoosh it between your fingers. Maybe the kiddos would like to do this part?


Once it's all mixed together, it should look like a huge chocolate ball.


Take a small amount and roll into a ball. I used a tablespoon which ended up making large walnut sized balls. If you want to make smaller ones, you'll have more bonbons. Place the balls on a wax paper or aluminum foil-covered cookie sheet. Once you've rolled all the balls, place in the refrigerator.*


In a double-boiler, melt the candy coating (I used vanilla).** Stir every couple minutes.


After the bark is melted, use a small spoon and drop one ball in making sure it gets covered. Then scoop it out and place it back on the cookie sheet.*** Try to let some of the bark drip off in the pan otherwise you'll have a big mess on the cookie sheet. Repeat until all the balls are coated in bark.

Place back into the refrigerator until the coating is hard. Then place in a tightly covered bowl.

(Sorry, I forgot to take a photo of the finished product. I made these for birthday treat day at work and there were NONE left over.)


NOTES:
*I left the balls in the refrigerator overnight, but a few hours would be fine.

**If you don't have a double boiler, you could melt the bark in the microwave for a minute and then stir. Keep repeating until it's all melted. Or, I've filled a saucepan with water and placed a glass bowl on the rim as a makeshift double boiler.

***You can sprinkle color sugar, chocolate sprinkles, cocoa, etc on at this point if you wish. I forgot to do this part, but it didn't matter.

Apr 1, 2013

Fudge Brownie Cupcakes with Peanut Butter Frosting

1/2 c. (1 stick) butter
3/4 c. packed brown sugar
1/2 c. cocoa powder
1/2 tbsp. vanilla extract
2 eggs
1/2 tsp. baking powder
3/4 c. flour
1 c. chocolate chips (optional)

Preheat oven to 375F degrees. Line muffin tin with paper cups.

Melt butter in the microwave in a large microwave safe bowl. Mix in the sugar until smooth and microwave for about 1 minute. Stir the mixture until smooth again. Whisk in the vanilla and eggs. In a separate bowl, mix together the salt, baking powder, cocoa powder, and flour. Slowly add to the wet ingredients* and stir until completely combined. Fold in the chocolate chips.

Fill the muffin tins about 2/3 full. Depending on how full you fill the muffin tins, you could get anywhere from 8-12 cupcakes. Bake in the prepared muffin tin for about 8-12 minutes (The less you bake them, the gooey-ier they are). Allow to cool completely before frosting and decorating with sprinkles.

Peanut Butter Frosting
(Makes enough to frost 10-12 cupcakes)

1 c. creamy peanut butter
1 c. powdered sugar
5 tbsp. unsalted butter, room temperature
1 tsp. vanilla extract
1/4 tsp. salt
1/3 c. heavy cream

In large bowl, add the peanut butter, confectioners sugar, butter, vanilla and salt. Mix on medium-low speed until creamy and smooth. Slowly add the cream and beat on very high speed until the mixture is light and fluffy. Spread on cooled cupakes and top with sprinkles**.


NOTES:
*I added a bit, then stirred really well before adding a bit more. Continue until all is mixed together.
**Sprinkles are optional, but I used chocolate ones.
****You could easily use boxed brownie mix as a shortcut, but would need to adjust the frosting accordingly it only makes enough for 10-12 cupcakes.