Dec 25, 2016

12 Days of Christmas

I'm participating in a 12 Days of Christmas gift exchange coordinated on one of the Yahoo cross stitch groups.  I received 12 wrapped and numbered gifts from Pam K in TN.  It seems I've known her forever online, but this is the first time I've been in an exchange with her.  :)  Without further adieu....

DAY ONE
Day one brought me a pack of highlighter markers in neon yellow.  I love office supplies so I'm sure these will come in handy.


DAY TWO
Day two brought me a bright, flower pin cushion made of felt.  It brings a little spring/summer into the day as the temperatures here are in the negatives and the ground is covered in snow.  This will come in handy when I sew as I usually just throw my pins on the table, lol.


I'm not sure of the other gifts since I haven't opened them yet, but with the first two gifts there were handwritten notes from Pam.  Very nice touch!

DAY THREE
Day three brought me a pretty peacock thread organizer. I've not seen one like it... very pretty.


DAY FOUR
On day four, I received two mini flashlights with a note about never having too many.  I'd have to agree.  I'm going to put one in my car and one in my bedroom.


DAY FIVE
Pam taped the note on the outside of the wrapped gift for day five. I was excited to unwrap it... a sparky infinity scarf made by Pam!


DAY SIX
Day six brought me a wooden owl stitchable kit.  I've always want to try one of these!  Owls are so in vogue now, too.


DAY SEVEN
I have always wanted one of these!  Whenever I went to Harbor Freight, I thought about getting one, but never did.  Now, I have one. Yay!

 
DAY EIGHT
Earlier this year, I involved myself in yet another creative hobby... adult coloring.  Day eight brought me two new coloring books.  How fun is that??


DAYS 9 AND 10
The smell of lilacs brings back loving memories of childhood. I had to LOL when I read Pam's note about how difficult it was to find "anything" that had the scent of lilacs.  At this time of year, I imagine so.  :)  I already have the gifts in use. The house smells great!

 
DAY 11

This day brought me the letter "M".  I'm looking forward to personalizing it and hanging it in my craft room.


DAY 12
Imagine my surprise when I opened this gift and found Victorian Pansies kits... I did a couple of these years ago: a needlebook and a scissor fob.  I am so excited to have more matching accessories. I didn't even know these existed!


I had so much fun opening these gifts.  Pam did a really great job of choosing gifts that fit ME.  I loved the handwritten notes that came with each gift.  Thank you to Pam for everything!

Dec 13, 2016

Christmas is in the Air

This will be the third Christmas without my parents. For some reason, this year is bothering me more than the previous ones.  My Mom loved holidays... especially Christmas. She was like an excited little kid opening her presents.  My Dad was the grumpy sort on holidays... even though he didn't show it, he liked opening gifts and having family there.


I managed to get my Christmas decorations up early this year.  It's nice to come home and turn on the lights to the tree and mantle.

 
STITCHY STUFF
In my last post, I mentioned I participated in two ornament exchanges this year.  I received the second one shortly after my post.  Here's the one I received from Sharon S in NJ.


FREEBIE


Reindeer Card
by Lesley Teare
HERE


GIVEAWAY
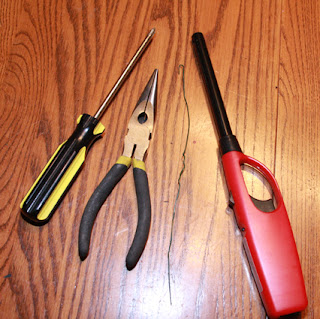
I was hoping that my giveaway question would elicit creative responses, but alas ::sigh:: no one took the bait.  As my readers may recall, I asked what does an Ott light, screwdriver, needle nose pliers, wire, and a lighter have in common.


They all assisted me with this problem:


The starter cord on the snowblower broke on my first pull during the first snowfall.  Luckily, "Little Blow" caught and stayed running until I got the driveway and sidewalk clean.


According to Google, the starter assembly above isn't made to be repaired. The manufacturer would rather you buy a new assembly for $45.  What's a girl to do?  YouTube it, of course!  The video wasn't quite as easy as the guy made it look.  An hour later and a bit of frustration, I finally got it fixed.  Saved $45 and I was so proud of myself!  I'm my Dad's girl, for sure.


There was one winning guess to my giveaway question.  Drum roll please.....
Pam in IL
"As for the screwdriver, pliers, lighter, wire and Ott light -- I think they were used for a snowblower repair project."
 
Pam -- I'll be getting something out in the mail to you soon!
 
Until next time...


Dec 5, 2016

Marvelous Monday Update 12/5/2016

WEATHER
On December 4, my area was greeted with the first snowfall of the year.  Mother Nature decided to bless us with 5.3" of very wet, heavy snow.  I went out twice to clear the driveway.  The second time, it took me two hours.  Welcome to winter!

 
STITCHY STUFF
I've participated in two ornament exchanges this year. Both of the ornaments I created for my partners turned out so good I wanted to keep them for myself.  Anyone else have this problem?

 
Design: Woolly & Cosy
Designer:  Valentina Sardu
Fabric: 32ct White Opalescent Linen
Fibers: DMC threads
 
I finished it into an ornament using a green fabric with tiny Christmas trees and swirling silver dots.  Red felt was cut with a pinking rotary cutter and sandwiched between the stitched design and the green backing.  A green satin ribbon topped off the ornament.  It was such a quick stitch, I'd like to do a couple more.

 
Design: One More Stitch
Designer: The Victoria Sampler
Fabric: 28ct Natural Linen
Fibers: DMC
Embellishments: Beads, Buttons, String Pearls
 
This design was featured in the 2014 Just Cross Stitch Ornament issue.  I took some creative liberties with finishing it.  Both the front and back are stitched on the Natural Linen.  The back is personalized with the recipient's name as well as mine.  I sent it to Deb H in TX as a Christmas Ornament Exchange.  Doh!  I just realized I didn't stitch the date.  Buttons and beads are on the front and back.  The edge is trimmed with string pearls and topped with a satin ribbon hanger.
 
Next up is what I received from Deb. It's called Snowy Owl Snowman by Jim Shore.  It's absolutely beautiful... both the stitching and the finishing!  She has a blog that shows lots of her other gorgeous finishes. If you're interested in eye candy, click on over HERE.


Thank You, Deb!

WATERCOLOR
I've been practicing my watercolor skills (or lack thereof) using YouTube videos. I recently did this barn painting using Shinhan Professional Watercolors. One of my classmates bought a set when she was in Korea. The paints work really nice and are very vibrant.


I wasn't real happy with how it turned out so I gave it to a friend who thought it "is awesome".  I am going to do another one and adjust the color values a bit.

I've made a bit of progress on the "masterpiece" as my instructor called our projects.  Once I get farther along, I'm going to set up an appointment to get some critique from him.


Even though my photo shows the dark bank on the left side, I'm not really liking how it looks. I'm going to try to scrub some of it out of there to make it lighter or a different shade.

GIVEAWAY
I'm going to put together a package of things from my stash for the person who can answer this question:  What does an Ott light, needle nose pliers, lighter, and wire have in common?  (Hint: a project)  Leave a comment with your guess.  Giveaway open to U.S. residents, only.  Sorry!


FREEBIE


First Snow by The Drawn Thread
Click HERE.

Oct 10, 2016

Not For The Paint of Heart

Get it?  Faint of heart....  Okay, I won't quit my day job. Haha!

As you know, a while back I started a 6-week watercolor painting class.  It was cut short a couple weeks ago due to the instructor needing to have unplanned surgery.  A LOT of information was crammed into those five weeks!  Every week, we learned new techniques and then started a new project to practice the technique.  At the same time, we were to finish our "masterpiece".  Heh, yeah that didn't happen.

The only project I finished during the class was the one where we learned about washes.  I liked my painting just fine until... the instructor had us lift out fog.  In retrospect, I would've used a smaller brush to wet the area before lift off.  Would've been nice if he would've told us what brush sizes to use.


Yesterday, I finished one where we learned clouds, water, rocks, and sand.  At first, I was getting frustrated because I didn't like how the rocks on the right side of the page looked.  I think it looks okay now.  The interesting thing about this project is that we all started with the same basic design and they all turned out different.


Each week when the instructor did a demonstration painting, each of us had to guess a number to see who "won" the painting.  I "won" the instructor's version of the rock and water painting. The nice thing is there were only four of us in class so each of us got a painting.


I'm still working on the floral exercise.  I apparently, I missed a petal at the bottom and painted over it with the background wash.  So I had to add it and darken the lower petals.  I'm thinking I should darken the upper ones also, but the instructor says to leave them. What do you think?


Sadly, my "masterpiece" is barely started.  I didn't like having so many unfinished paintings so I focused on finishing those rather than start yet another one.  This is all the farther I've gotten.


Things I've learned:
•  Practice, practice, practice!  I still haven't gotten the hang of wet-on-wet.
•  Know when to stop.  If you're unsure, stop.
•  Cheap watercolor paper sucks.  Spring for the good stuff.  There's less frustration.

Until next time...


Sep 26, 2016

Gotta Love New Toys - The AR390SS

I've been wanting a pressure washer for several years.  I didn't want to have to deal with a gasoline powered one so I started looking at electric ones.  I looked at several brands at big box stores and then went online to read reviews about them.  My oh my were they bad! 

I came across the AR BLUE Clean AR390SS on Amazon.  I'd never heard of the company before... but then I wasn't a pressure washer aficionado either.  After reading all the positive reviews and questions posted (over 400!), I decided to purchase the AR390SS.

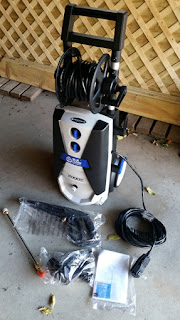
I'm happy to report so far I am not disappointed. The AR390SS was delivered packed inside another box.


Features include: 2000psi, 1.4gpm, 30ft hose, 35ft cord with a GFCI plug, detergent tank, and 4 quick connect nozzles (soap, degree, 25 degree, and turbo). 


It took me less than 10 minutes to assemble -- which involved attaching the spray gun holster (just slid down over a slot), the nozzle tray with one phillips-head screw, the stabilizer foot (another screw), and the garden hose adapter (which required a 5/16" or 8mm hex wrench).  I had to borrow the hex wrench from a guy at work and now owe the fab shop a pan of brownies.


Doesn't it remind you of a little guy wearing a tuxedo?  A very attractive machine, if I do say so myself!


At the back, there are little "arms" to hold three nozzles. The turbo nozzle has it's own holder.


The machine is compact and while it's a little hefty weight wise (about 35 lbs, I think), it's not difficult to move around on it's wheels.
Once the pressure hose was attached to the wand, and the garden hose attached to the front, it was time to see what the AR390SS could do!  From the ground, I used the 0 degree attachment to clean the outside of my gutters. What a difference!

Before

After
Then I used the soap nozzle to soap up the carpeting on my front and back steps/landings. Since I've never used a pressure washer with a soap dispenser, I wasn't sure what setting to use. At the medium setting, it seemed to use up the soap relatively quickly.

While letting the soap do it's "magic", I used the 25-degree nozzle to clean the windows. It did a fairly good job considering I only used water. Once the soap had soaked in, I switched to the turbo nozzle. Switching from one nozzle to another was fast and easy. The turbo nozzle did a great job of removing years of grime and crusted algae build up on the outdoor carpeting that covers my steps. Both areas look amazing!!


Before - You can see the walk path.


After using the turbo nozzle
The front porch covered in crusty algae... Yuck!
After - Fantastic!
I LOVE my new toy!  When I get time, I will try it on the car.  :)

Until next time....

Sep 23, 2016

Painting Up A Storm!

In my last post, I mentioned taking a watercolor class.  Our first homework assignment was to draw a thumbnail sketch of what we wanted to paint for our masterpiece and then draw a "cartoon" of what it would look like full size.  The instructor really liked my cartoon -- which surprised me because I think it's rather rudimentary.  He thinks it would be fun if I did an impressionist painting.  Me, I'm not sure.


The day I was to take my cartoon to class, it was raining.  Look what I came up with to protect my cartoon!  My classmates thought it was ingenius. LOL


During the second week of class, we learned about and practiced watercolor painting techniques: Wet on Wet, Wet on Damp, Wet on Dry, Washes, Hard Edge/Soft Edge, and Drybrushing.


The instructor walked us through doing our first class painting project using the techniques we learned and practiced.


I thought my painting was going along swimmingly well until the instructor had us "lift" fog into our paintings.  He said my paint lifted a little too well.  I think my fog bank is too wide.  Not bad though, for a first time using some of these techniques.  We also got to use frisket which is really useful to maintain white highlights.

Week three, we learned how to paint florals.  Mine is still a work in progress.


Another student and I have been meeting once a week outside of class to do our homework and practice painting.  I'm trying to get this floral done so I can move on to my "masterpiece" which is supposed to be mostly done by next week. I haven't even started painting it yet. Yikes!

Week four, we learned about painting skies and water.  While my clouds look okay, I think they're way too dark for the water below.


Rocks and trees will be taught in the next classes.  The white areas in the previous painting are where the rocks and trees will go.

In a different class offered by the park district, I learned how to paint trees.  The instructor remembered me from when I took the floral class back in June.  He asked if I'd been doing some painting because I was using techniques I learned elsewhere.  I finished painting one tree and started on a second.


Until next time...