
Can't afford professional framing? Does framing needlework strike fear in your heart? Afraid you might mess something up and all the TLC you put into those stitches would be for naught? Don't worry (Be happy!)... It's easier than you think! I've been doing my own matting and framing for years and have never ruined a single piece. So, how do I do it?
Step One: If your project is washable, wash it. Even though it looks clean, dirt and oils from your skin and the environment most surely have attached themselves to your needlework. I use lukewarm or cool water and wet the entire stitched project. I put a tiny bit of Dawn dishwashing detergent on my hands and rub together. Then with hands on front and back of my needlework, I gently rub my hands together over the entire piece. Never, ever rub the fabric against itself or crumple it up - Unless your wish is to have a bundle of wrinkles that more than likely won't come out. If they do, it won't be easy. After the needlework is cleaned with Dawn, I rinse and rinse and rinse again to make sure the soap is gone. At this point, you can either 1) Hang the piece to dry. -or- 2) lay it face down on a white bath towel to dry. Sometimes I'll roll it up in the towel to soak up the excess water. For more info on washing, I have a blog entry called: To Bathe, or Not To Bathe.
Just an FYI... Please be aware it is not recommended to wash hand-dyed fabrics and floss. If you use hand-dyeds and HAVE to clean your project, use cold water to reduce the chance of the dyes running. There still is a chance it will, even with cold water. So, proceed with caution.
Step Two: When the fabric is slightly damp, press it with a hot (no steam) iron to remove any wrinkles and help it to dry faster.

Step Three: You will need to decide what size frame you're going to use. If you really want to save money on the cost of the frame, visit your local thrift stores and consignment shops. Frames are usually very, very inexpensive there. Yard sales are also good places to pick up inexpensive frames. Don't worry if the frame doesn't have glass. I almost always have mine cut at a local glass shop and it's not expensive at all. You can have glass cut at a framing place, but you'll pay more.
Be sure to clean the inside of the frame. You don't want any dirt getting on your needlework. Just use a damp soapy cloth to wipe the dirt out. Then use a clean (non-soapy) cloth to wipe away the soap residue. Let dry. I wouldn't recommend immersing the frame in water, especially if it's a wood frame.
The fabric of your stitched piece should be 4-6" larger in width and length of the inside dimensions of the frame. If your needlework isn't large enough to fit into the chosen frame, you'll have to sew additional cotton fabric along the edges of your needlework.
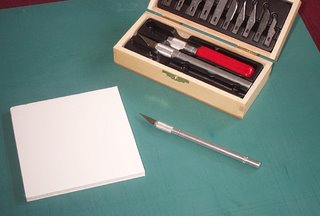
Step Four: Cut your foam core board 1/8" smaller than the inside dimensions of your frame. Foam core comes in sheets 20x30" in size and is 1/4" thick. It can be found at JoAnn Fabrics, Michaels, and Hobby Lobby. When cutting foam core, use a sharp craft knife. Cut slowly and carefully using several passes. Don't try to cut through the entire thing at once, or you'll end up with a jagged edge. Trust me, I know from experience! Do it slow and easy, and you'll be fine.
Step Five: Find the center of your foam core by drawing a light pencil line from corner to corner forming an "X". Then find the center of your stitched piece by folding it into quarters. Place a pin in the center of your stitched piece and then put the point of the pin at the center of the foam core. Press into place. Using T-pins, anchor the stitched project along the edges of the foam core.

You can also use binder clips to hold the fabric in place -- it's easier and faster. Once you have the stitched project secured to the foam core, you can remove the pin in the center.

Step Six: Time to lace up! You will need cotton thread to lace your project onto the foam core. There are several alternatives you can use: crochet cotton, 6 strands of white embroidery floss, kite string, and dental floss. I have used crochet cotton and embroidery floss. You'll need a nice long piece - at least 2-3 feet in length. Anything long than that and you'll probably end up getting it tangled and knotted... which will end in frustration! Starting at one edge, secure (it's OK to knot it) the end of your thread to the fabric on the backside of the foam core using a sharp needle. Insert the needle in one size then the other creating a zig-zag with the thread. Once you've done the entire length, secure the thread and cut it close to the fabric. If you find that you don't have enough string to lace the entire piece, it's OK to knot it to another 2-3 ft. piece. Just make sure the knot is secure and it's toward the center of the zigzag.

Tucking the corners in neatly, start the entire process again on the opposite sides. After I get done lacing, I'll usually use a slip stitch and stitch up the corners to make it look neater. You can then remove the T-pins.

Step Seven: If you had to sew on additional fabric, you'll need a mat to cover it up. You may want one anyway for asthetic purposes. If you aren't using a mat board, you'll have to get some spacers to keep your project from touching the glass. You can purchase ready cut mat boards at almost any place that sells frames. If your project is an odd size or you wish to have an unusual opening, you'll have to have it custom cut at a store that does framing (Ben Franklin Crafts, Michaels, Hobby Lobby). I have all the tools so I usually cut my own.

Assemble the framing materials -- frame, glass, mat board, laced project. Be sure to thoroughly clean the glass before adding the matboard and project. Be aware that some frames are not deep enough to accomodate the thickeness of the glass, mat board, and foam core. It's still OK to use these frames, you'll just have to use acid-free mounting tape to hold the project securely in the frame. I use it anyway even if the frame is thick enough.

Step Eight: Cut a piece of brown crafters paper (You can get a big roll of this at home improvement stores for around $6 and it lasts forever.) slightly smaller than the back of the frame. The easiest way to do this is trace the perimeter of the frame. Then cut it slightly smaller. Place double-sided archival tape along each of the four sides on the back of the frame. Gently press the brown paper to the back of the frame. Add a hanger to the back of the frame.

The smaller hangers will work for smaller sized projects. The above frame is 5x5" in size. Anything larger than 11x14, I recommend using the wire hangers. You don't want your projects falling off the wall, like one of mine did once and go bouncing down the stairs! Luckily it wasn't damaged, but I did put a wire hanger on the back afterwards!

Viola! You've just framed your first piece. It wasn't so bad, was it?
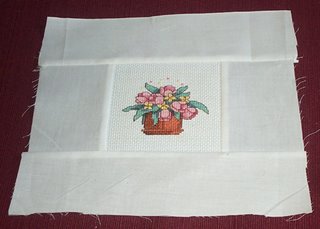
P.S. If anyone has info on the above piece (the flowers), please let me know. It was another "rescue".


11 comments:
Fantastic instructions!! I wish I had seen these before my first attempt, it might have saved me some trouble.
Amazing ... I am a professional photographer and could never figure out how to get my stitching framed because it was so bulky. I'm going to link to this post on my blog so I can find it later.
I visited your blog after you had left me the lovely comments...and what do I find? A very interesting and informative article on framing!! This is brilliant so clear with such fantastic instructions...thank-you for sharing your knowledge and experience...I will have a DIY attempt myself sometime after reading this...Bravo as our French friends say :-)
Wow, Meari! I just loved your framing instructions. You do such a nice job and make it look so simple. I've done some myself but not like this and not with the same great results. Thank you so much for a great tutorial!
I just love your instructions. You make it simple to follow. Thank you so much. I do plan to use it for my next framing attempt.
Great instructions! I have about 8 punchneedle projects completed, with all my mounting and framing materials sitting in the closet. Now I'm inspired to finally wrap things up!
Excellent idea! I loved it Meari.
Marissa in Mexico
"I Love Cross Stitch" Yahoo Group
:)
Excellent idea and instructions! I loved it Meari!
Thanks for sharing
Marissa in Mexico
"I Love Cross Stitch" Yahoo Group
:)
Thanks for posting this!
I just have 1 question (for now!) You mentioned that the brown paper used to back the piece can be found at a home improvement store. So, I did a search on the sites for both Lowe's and Home Depot, but could not find it. Is it a local store that I should go to, or am I searching under the wrong product description (brown crafters paper)?
Thanks!
Thanks again Meari! Your instructions saved my life (well my pocketbook at least ;))
Thanks Meari for the wonderful framing instructions. Love, Love, Love your tutorials.
Stitchy Hugs
Post a Comment