Jun 26, 2018

Quaker Mailart Exchange

This was my first time participating in a Quaker themed mailart exchange so I was pretty excited.  I chose my designs and decided on the envelope layout.  I had a lot of fun stitching it up.

Now that the recipient, Pam in IL at My Stitchin-N-Stuff, has received it, I can show it!  Most of the design came from a chart called Quaker Blues by From the Heart Needle Art.  I used DMC 931 floss to stitch it monochrome.

My initials on the front
Her initials on the back
Goodies I was able to shove inside

Linked to: Stitching Lotus SAL
This was the first time I did a triangle flap and the design I used was just perfect for it.  Despite the enjoyment I had planning and stitching this mailart, I had such a frustrating time assembling it.  I made rookie seamstress mistakes which I shook my head in disbelief when I had to rip it apart not once, but twice.

I also tried a 'new to me' fabric by True Colors.  It was 28ct evenweave, but felt a bit plastic-y and I think the mottled fabric design was painted on.  Very pretty, though. 

The person sending to me stitched mine up really fast!  Mailing date was July and I received this beautiful mailart at the end of April!

Thank you so much, Kita!  I really love it.

In addition to the envelope, Kita sent a pretty butterfly note card, floss, and some beaded kits.


My "secret" goal is to get a mailart from every state as well as other countries so I was thrilled to get one from Tennessee where Kita is from.

P.S.  If you're interested in learning how to make a mailart, I have a tutorial on my left side bar, or you can click HERE.

Until next time...

Apr 26, 2018

DIY at The Homestead

With warmer weather comes DIY.  First up this year is some much needed maintenance on The Homestead.  Last year, the northern neighbors' home went into foreclosure. The new owner hired a contractor to do a lot of work on the inside and outside.  With that came a huge dumpster parked in the next door driveway.  I took "advantage" of the situation and asked the contractor if he'd clean out behind of my garage.  You see, when I moved there the previous owner(s) used the two foot wide area as a dumpster for tree branches and brush.  For $100, the guy had a kid clean it up for me.  The contractor informed me that the plywood covering the garage windows was badly rotten and asked if I wanted him to remove it... at no extra cost.  Of course!  Who wouldn't?

I replaced the plywood last Fall, but the weather turned cold before I could get it painted.  My first project this year was to primer/paint the windows.  A primer/paint combo is the best thing ever!!


Next, I put new mulch on one the flower beds.  This one will be full of hostas before long.


The above photo is what it looked like before.  And now, it's all pretty again with cypress mulch.  (Side Note:  It's been over six months since I had the roof replaced and I'm still admiring how good it looks, LoL -- Yeah, I'm strange like that!) Still need to trim up that bush.


Lastly, I've been tackling the window trim.  The basement windows and garage windows are wood clad.  They really needed a scraping and new paint.


I used a round brass brush that attaches to a drill to scrape the old peeling paint.  I worked great!  Who'da thunk it?  It sure beat using a scraper.


I really should have removed all the dried caulk from around the grilles on the garage window, but I figure I'll go back later and do it when the weather is a bit warmer.  


Plus the grilles will need another coat of paint.  I can kill two birds with one stone.  For now, it looks much, much better.


I'm still trying to figure out why there is a 1" eye hook screwed into the bottom frame of the window.  I tried to take it out, but it's in there pretty good!

Until Next Time...

Apr 23, 2018

Another Finish and WIP Update

First up is my third finish of 2018.  This time I stitched up an inexpensive Stitch-N-Hang kit called "Santa's Sleigh" (#3609).  


I made the FFO into a round ornament with Ho-Ho-Ho ruched ribbon and a handmade bow with a snowflake button.  The photo doesn't do it justice, but I added some Kreinik on the stars for a bit a sparkle.

Design: Santa's Sleigh
Designer:  Needlemagic Inc, Kit 3609
Fabric: 28ct White Evenweave
Fibers: Cotton Floss, Kreinik Blending Filament
Embellishments: Ruched Ribbon, Snowflake Button, Handmade Bow
 
Linked up:
Super Mom Stitchery Party #139

I've put in over eight hours on Swallows since the last time I showed the WIP I'm finishing up for a stitching buddy.  This is what it looked like back in January:


Here's what it looks like now:


The entire right side is finished.  I'll be starting on the left side when I pick it up again.

Until Next Time...

Mar 21, 2018

Second Finish of 2018

I actually finished stitching this project at the end of 2017, but recently created the FFO (fully finished object).

This...


'Let It Snow' kit #021-1058 Janlynn Designs for the Needle.  I swapped the 18ct aida for 28ct White Linen and stitched away.


Then I added This...


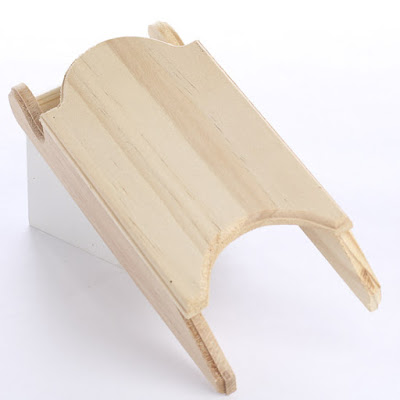
When I went to visit my second mama at Christmas last year, we went shopping at AC Moore.  These sleds were on clearance so we both scooped up a bunch.  Factory Direct Craft also sells these same ones, if anyone is interested.

A little this and a little that, equals this:


Design:  Let It Snow
Designer: Janlynn Designs for the Needle
Kit:  021-1058
Fabric:  28ct White Linen
Fibers:  Cotton Threads from Kit
Embellishments:  Handmade Cording, Snowflake Buttons

Stitching Lotus Smalls SAL
Super Mom Stitchery Link Party #138 

Until next time....


Stitchers Day Exchange 2018

One of my favorite exchanges is the Stitchers Day Exchange coordinated on one of the Yahoo Groups.  I've participated for the last five years and each year I eagerly await to see what my partner creates to reflect the theme celebrating stitchers.  It's also a time for me to put my creative juices to work in coming up with a project I think my partner will like.  So much fun!

This year, I had a chart in mind that I have had in my stash FOREVER and have always wanted to stitch it.

"Do Not Disturb" by Linda Orme at Forever in My Heart c2003. 
I recently learned that she passed away a few years ago,
so this chart is OOP.
Here's my chance, right?!  With my partner's color preference in mind, I set to work choosing a fabric and floss.... and started stitching.


I had planned on making a flatfold, but finding the perfect finishing fabric proved to be a challenge.  I did find it though!  Here's what the FFO (fully finished object) looks like:


Stitched on 28ct Silkweaver Solo Jubilee fabric with DMC threads.
Embellished with cream/gold ric-rac and tiny pair of scissors.
Sent to DJ at Tickled Pink in Stitches

If anyone is interested in making a flatfold like this, I used a combination of two tutorials listed in my left side bar.  I used techniques from the flatfold and dimensional flat ornament finishing.  I just love those little scissors!

Incidentally, this was my first finish of 2018 -- Woo Hoo!

Now... onto what my partner sent me...

All the way from France came these lovelies!

My partner, Mary from Le Coeur Celtic, sent me a beautifully stitched scissor fob and matchbook needlebook.  The scissor fob is called 'The Stitchers Favorite Fob' by The Sweetheart Tree.  I've had this chart in my stash-to-do pile for a long time and love that I now have it all stitched up.  The needlebook cover has beautifully stitched Hardanger on it in a very pretty variegated yellow/orange.


And look!  She stitched my intials and year on it. 


The opposite side has specialty stitches.  Aren't those tiny spools of thread adorable?

Thank you very much, Mary.  I love it!

Until next time...