

It's been a while since I've blogged. Quite a bit has happened since I wrote about my car purchase. All good, I assure you! When I get more time, I'll recap the end of 2019. For now, let's start with my latest DIY projects.
PROJECT #01
My bathroom towel bar is made of ceramic and acrylic. One day while getting ready for work, the acrylic bar broke. Some may say, "Just go buy a new towel bar." Well, not so easy in my case. I have ceramic tiles on the walls and ceiling of my bathroom so I can't just install a new towel bar without risking damage to the vintage tiles. Plus, there would be holes where the old towel bar is.
What to do? What to do? I measured the diameter of the acrylic bar then wandered around my basement workshop for ideas. Urecka!!
I had a wood dowel the same diameter. I cut it to the size I needed for the bar, then painted it and added many coats of polyurethane to protect it from damp hand towels.

Installation was simple. Just slide it in place. It looks great! A cheap and easy repair.

PROJECT #2
My second project was a bit more involved but much more fun. Long time readers know that I like to take thrift store finds and make them my own. This was one of those projects.


I bought this framed "art" several years at a thrift store for $3. I bought it strictly for the frame. I knew it would use it someday. Well, it's now someday!
When I dismantle a frame, I start by taking the cardboard or paper covering off the back of the art piece. Then I take out the staples that hold the art in the frame. For whatever reason, the backing on this frame was glued to the frame and the art piece after the art was stapled in place. Very odd! Typically, I've not seen this. I had to use a knife to slide under the cardboard backing to loosen it from the perimeter of the frame. Then I had to bend the cardboard up so I could remove the staples holding the art and mat board in the frame.

Once I got that PITA 'art' out of the frame, I could really get to work. I set the glass aside so it wouldn't get broken. In order to cut the frame to size, it had to be totally taken apart.
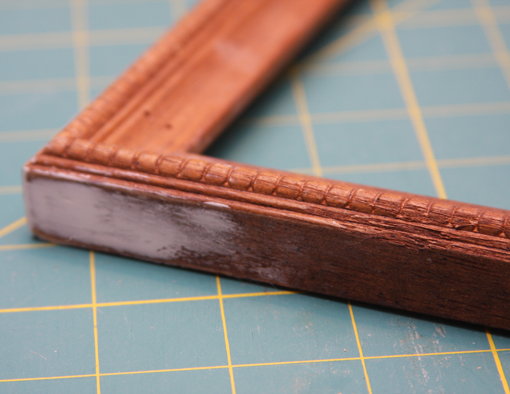
 |
| Look how beautiful the moulding is! |

Remember.... measure twice, cut once! This is always the nerve-wracking part. Cuz if you screw it up, there's no going back! This time, I only had to cut the side pieces to the size I needed.

Time to put the pieces together. Piece of cake. I always pre-drill holes before using small nails to put the frame back together. I also use wood glue. This was the first time I used TiteBond Ultimate wood glue and I have to admit I was a bit skeptical as to it's holding power since it's much thinner consistency compared to the Elmers wood glue I typically use.
The hardest part for me is waiting for the glue to dry overnight. I'm in such a hurry to finish my project!
Once dried, I filled all the staple holes and imperfections with wood filler. I also countersink the nails and fill them so you can't see where the nails are. Like waiting for glue to dry, waiting for the wood filler to dry is torture!
Once the wood filler is dry, I lightly sand it smooth. Then comes the fun part. How do I want to finish it? Wood filler can be stained, but I've not done it yet. I usually end up painting my frames to coordinate with what I'll be putting in it.


I found out that my local glass shop will cut the glass to the size I want also for $1 per cut. I only need one cut. So, for $4.00 total, I now have a nice 'new' frame to use.
I'm so pleased with how it turned out!

Until next time...


12 comments:
Everything looks great on your blog sweetie! 🥰
Sue V
Your creativity and resourcefulness are an inspiration, Meari. Thanks for sharing!
Sandy in NM
Wow! Your frame turned out beautifully!! I'm always so impressed with your DIY projects! :D
Pam in TN
I think all your DIY projects look great.
Marl
You are such a handywoman, Meari! I am so impressed. Great blog!
Dorrie in Prague
Good to see a new blog post, Meari! Well done on your DIY projects. That frame looks fabulous; can't wait to see what you put in it.
Lovely work as always, Meari!
Well done , You make it look so easy , but I know I could not do it .
Good for you.
I always enjoy seeing your posts, whether stitching or do-it-yourself related, Meari. Love how you aren't afraid to tackle anything :) Great job on the frame and the towel bar--it's such fun to save money and have that great feeling of doing it yourself, isn't it?
The frame turned out beautiful Meari. Great job on the towel bar too, very creative.
You're awesome!
You astound me with your abilities to fix things!! I love what you did to the frame and wish I had your talent for that. I have tons of old frames I could repurpose if only I had your know-how! Well done!!
Post a Comment