
Melinda of Family Business asked me for my Top Ten Tips to know before starting Japanese Garden. When I started this project in 2006 (I know… Bad me for taking so long to finish it!), it was the first project I had ever worked on evenweave. First project using specialty stitches. First project using silk threads. First project with beads. I liked the design and I jumped right in, not knowing what I got myself into! Here’s what I've done and what I’ve learned along the way (click on the links for additional information):
• This is an expensive project. I swapped out almost every “called for” silk thread for less expensive ones, mostly Victoria Clayton and Eterna. Eterna silks are like satin threads and I can say that I don’t really enjoy using them. VC threads are really nice to work with. I keep all the floss for JG in its own case.

If I were to do another Chatelaine, I would use DMC. I’ve seen several done in DMC and they look just as beautiful. I’ve also swapped out some of the beads. I’m sure if you place my project next to one that’s done in the “called for” supplies, it would look totally different. I’m OK with that since mine will never sit next to another and no one would be the wiser unless I told them, lol.
• I started this project on 26" scroll rods with no stand. Several months back, I was gifted a lap stand by another stitching blogger. It is so much easier to use a lap stand (or floor stand) than it is to try and balance one end of the scroll rods on the sofa while holding the other end. I have also learned to stitch two-handed which makes stitching go so much faster! It only took me a day to get the hang of two-handed stitching.
• Read all the instructions before starting to stitch. Sometimes, I’ve had to read them several times to wrap my head around what I was reading. As I’ve progressed through this project, I’ve made notes in pencil wherever I’ve made changes.

The instructions talk about various sections of the chart. I’ve highlighted the beginning of each section so that I can find them easily. It might not be that important if you work the project step-by-step in the instructions, but I didn’t do it that way.
• Since I started this project before it was available in stores, my chart is in PDF format. I keep everything to do with JG in a 1” binder and use it constantly while stitching on JG.

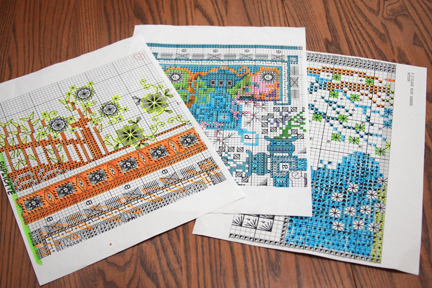
• The symbols in the original PDF document are rather small. I enlarged and printed sections of the chart. As I work through the sections, I use a highlighter to mark off the parts I’ve finished.
• The instructions for specialty stitches are very good. There have been times that I’ve had to frog and re-do them several times. Mine are not perfect... most people are not going to notice. So, don’t be intimidated by specialty stitches.
• If you don’t already use one, a needle threader will become a very good friend. There are several metallic threads in this project which gives it great sparklies. I use Krenik #4 braid in very short lengths… about 6” because short lengths are easier to work with and the finish on them doesn’t become dull from pulling it through the fabric over and over.
• A bead nabber or tacky bob will be very helpful when it comes time to do the beading. Personally I like the bead nabber when I’m doing beading. You’ll also need a beading needle, too. I plan on using invisible thread when I get to the beading part so that I’m not constantly changing colors to match the beads.
• Time. I love how JG is turning out, but I’ve learned through this project that doing so many specialty stitches takes me a while. Since I am slow at learning them and doing them, I have to have a chunk of time to work on JG.
• To protect the project from getting dirty and give a bit of cushion while stitching, I use ½” pipe insulation to put on the scroll rods. When JG is being stored during other project rotations, I fold the lap stand flat and I put it in a king size flannel pillowcase to keep the dust off it. Otherwise, I just lay the pillowcase over top when I’m not stitching.

• For me, one of the reasons it’s taken me so long to finish JG is getting all the stuff out… floss box for the JG silks, the binder, the lap stand… It takes up a lot more room than most of my projects.


Other WIP photos can be seen HERE.
Until next time,


40 comments:
What great tips for working on a Chatelaine! They are all solid. I think the biggest thing for me is the amount of time this will take. I love stitching on it but the repetitiveness gets to me sometimes.
I keep a scrap piece of fabric in my Chatelaine bag and practise my stitches on there before I put them in the Chatelaine. I find it helps me to make less mistakes and therefore less frogging lol.
You Japanese Garden is stunning and I know it will be a beauty done.
Great post about your journey with this amazing project :)
It is such a sweet project .
Hugs and love for you xxx
Thank you for the great post on your journey with this project.How much more do you have before it is finished?
Thanks for telling us about the journey through your garden. I think it explains exactly the steps you need to consider when tackling such an expansive piece (and expensive in terms of supplies). But to persevere is an achievement in itself and just think how proud you'll feel when it's finished and framed. Beautiful piece.
Awesome tips, Meari. I think I'm stealing the binder idea for my TW Peacock Tapestry!
One of these days I'll get up the mojo to stitch Misty Morning Vineyard and these tips will be handy!
It will be a beautiful piece when finished. You are really organized. Excited to see it finished. Post pic's please.
Diana-Indiana
It's so beautiful and after all the work you're putting into it it's sure to be an heirloom.
Some good tips, even for those working on other large or involved projects and not JG. You are on a roll this week.
Emily in NC
I had no idea you had been working on it since 2006, Meari!! I also had no idea all the steps and preparation that go into stitching a large project like this. If I ever do one myself, I'll know who to turn to for advice :)
Those are all great ideas!!! Thanks for sharing.
Betty in AZ (ILCS)
Great tips and true for just about any BAP. It's looking beautiful!
Great update, Meari! I appreciate the tips you've presented. I have one Chatelaine chart, Hummingbird Sparkly Elegance, but I'm not sure when I'll get to it. I was a bit taken back by the cost of the materials required, and I may just use the DMC and substitute beads of my choosing, as you suggest. Still, it will be a long time before I start it, so I'll just enjoy watching yours!
Hi Meari - I've never attemped to work one of these pieces. My Mother-in-Law is Japanese and I've been watching your progress on this one. I just love it. Thx for the tips should I ever get the nerve up to work on this. It is stunning!
Meari, this is why you are sooooo good at everything you do! You are very detail oriented; an amazing quality to have, plus you make sure you have everything in place before beginning a project. I am amazed at what you have accomplished! You go girlfriend! I look forward to seeing the finished piece!
Hugs,
Sue
Great blog on JG Meari!
Very good points on large projects - I have already implemented these in my small projects - great minds think alike - except I am still a newbie!
I agree with you on the satin floss - a pain even on my ornaments.
I really look forward to see you complete this daunting project!
Tara
Great tips that can be used on any project with beads, specialty stitches or very intricate.
Thanks for sharing.
Meari it is so going to be worth all the trouble when you're done. It's a beautiful project.
Oh My Gosh!!!! It is beautiful now when it is done it will be stunning Sincerely Kathy B in ohio
THANK YOU YOU ARE AMAZING. Oh my goodness, I am thrilled. Excited, and I am pretty sure I will be purchasing one of these charts. I am glad you talked about the substitution of the floss for DMC because that was a concern for me. Your hints and your great details. Thank you I will let you know what chart I choose and when I start. I do have a lap stand, and I so want to learn to stitch two handed. Melinda...
Great instructions and I am sure your picture will be beautiful when finished.
Marl
WOW! Lots of great tips! And some very beautiful stitching :)
I had to chuckle at your organization - it's so similar to mine, what with keeping the flosses in their own box, putting the chart into a binder, and marking off your finished stitches with a highlighter. I find that the
organization of a project is almost as much fun as actually working it.
I love that lap stand! What brand is it, do you know? Is there a limit to the length scroll rods it accommodates, or can you stretch it out infinitely? I have a floor stand and a lap stand, both from Hearthside Craftworks; but the lap stand works better if you have a sofa, and I don't have one of those, so I rarely use it.
Good luck with JG. It's such a pretty project.
Meg in NH
Great tips, Meari!
Meari,
I found the suggestions on your blog for working JG really interesting. I finished Chatelaine's Desert Garden Mandala not long ago and many of your suggestions I had also incorporated. One added one I would suggest. Find a piece of scrap fabric of the same count that you're using for the project and some spare floss and keep it handy. Before you start a new specialty stitch that you've never done before, stitch it a couple of times on the scrap. It's a quick, easy way to get the hang of working the stitch without using up the more expensive silks you've purchased for the project. It also eliminates the need for all of the frogging. If it doesn't look right on the scrap, who cares? You just work it again. I'm currently working Papillion's Around the World in 80 Stitches, which is almost all worked in specialty stitches I've never done. I just keep the scrap mounted on a snap frame handy and work the new stitches there until I'm confident I know how to do them. Works well!
Debbie K. in Illinois
Wow Meari, what great tips. So detailed and shows how organized you are.
And 2-handed stitching!! Absolutely amazing.
It's beautiful Meari. Those are excellent suggestions for any of our big projects. I'm starting to do two handed stitching now that I have the
floor frame. It does go faster but I still have to think about doing it,
it doesn't feel natural to me after stitching the other way for so long.
Cheryl K
What a great thing to share!!! I've done one large chatelaine and a few small and you defiantely need to be organized!!!
WOW Meari. Your JG is working up beautifully. I've looked at Chatelaine charts in the past but have never bought one....lol
sharyn
it has been a while since i have read any blogs.... but i was mesmorized by all the work involved in Japanese Garden.... interested about punch art.... have seen that kind of kit, but never tried it.... also, glad to hear about the money you saved by refinancing.....
take care, chris
Lots of good tips Meari...
Thanks!
Those are great tips! I'm working on Herbalarious, and have just reached the point of having to decide to bead as I go or not. I've been using a hoop, and that makes beading as I go not so good. After seeing your work on a scroll, I think I will try that.
Your Japanese Garden is beautiful!
Brilliant post Meari!!! You are so organized and your project ideas are great! Thanks so much for sharing! Your JG is gorgeous :D
Your WIP is looking wonderful so far.
I know all the pains of having to take everything out, then put it back, etc. will be worth at the end. I'm trying to find a more practical way to put away my wips and have them right at hand for easy access.
JG is looking really nice Meari.
I really like to see your progress on that piece.
Fatema
That's really interesting. Thanks for posting all the great information! Had never thought of it all that way before.
Meari,
Good morning. It's Michelle, AKA Spanish Princess. I don't know why I didn't think of it earlier, but I wanted to pass along that my mom's blog (www.bearthreaddesigns.blogspot.com) and FB page (https://www.facebook.com/pages/Bear-Thread-Designs/248017351965443?ref=hl) are having 2 drawings that end tomorrow at midnight.
1. For a floral fabric set: Like her FB page or follow her blog. One for each and one entry for each person who says you sent them. (post: http://bearthreaddesigns.blogspot.com/2012/07/oh-mama-give-way.html)
2. For her "Season to Applique" book: just post a patriotic project photo on FB page or email it to her to be entered (post: http://bearthreaddesigns.blogspot.com/2012/07/proud-patriotic-projects.html)
I am so sorry I didn't tell you sooner, but 2 jobs, a deployed hubby and toddler testing the terrible twos has left my brain mushy!! Can you believe I haven't picked up a needle in 110 days!!
Great tips! I have Pearl Lights, I will start it now that I read your how to's! Your stitching is so beautiful!
Beautiful stitching
You are my stitching idol!!!! Great tips!!
Post a Comment